Flink-Forms Tutorials
Use case: create HTML form to view details of CD in CD catalog
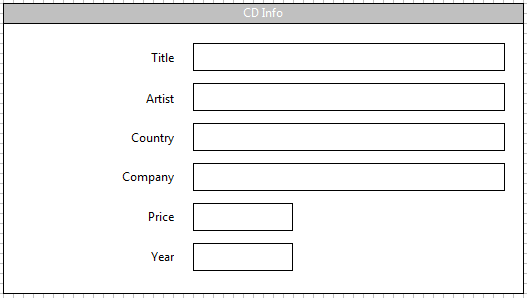
Short description: Create HTML page showing CD details in following format:
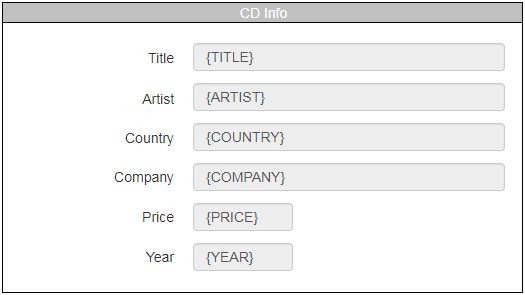
Data could be stored in some back end system or in a file. In our case the data will be stored in one XML file
Format of data is irrelevant. It could be any structured format (json, csv, xml etc.)
First 6 steps of this tutorial describe standard Flink-ESB procedures on how to create a new project, set up all of its components, and create routes implementing needed services. See also other Flink-ESB tutorials to find out more about it.
If you want to skip Flink-ESB standard steps, go directly to step 7, introducing Flink-Forms.
Go to the step showing Flink-Forms usage
Step 1: creating a new Flink-ESB apllication in Flink-ESB Editor
As CD catalog XML data we will use a file available on this URL. You have to download this file and save it locally on you PC.
 Open Flink-ESB Editor and select "File -> New -> Project" in the main menu. Double click "Flink-ESB" folder to expand it, select "Create New Flink-ESB Project" and press "Next"

 This opens a "New Flink-ESB Project" wizard. Enter data as on picture below: "Project Name" : flink-forms-project, unselect "Use default location" checkbox and select a folder where a project should be created:
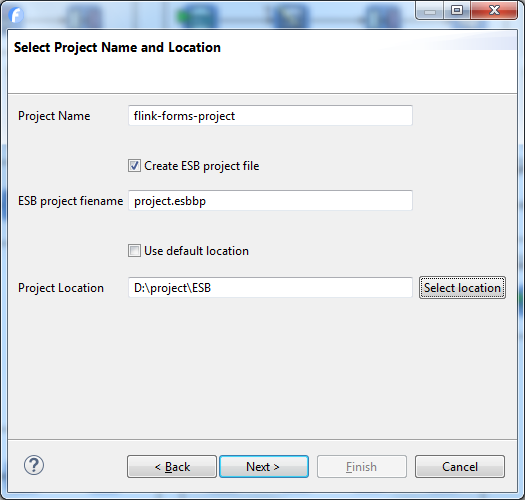
 Click "Next" and type some name in "Provider" field, after that click "Finish". This should create a new Flink-ESB project and open a file called "project.esbbp" in the main editor pane. This is where we will create all the components of the application.
Step 2: creating a route to read XML file (CD catalog) and save it in application context
This route should be called only once after application starts.
 Select "Route" component within "ESB General" palette, and drop it onto editor canvas. Type load-catalog as "ID" in the properties window:
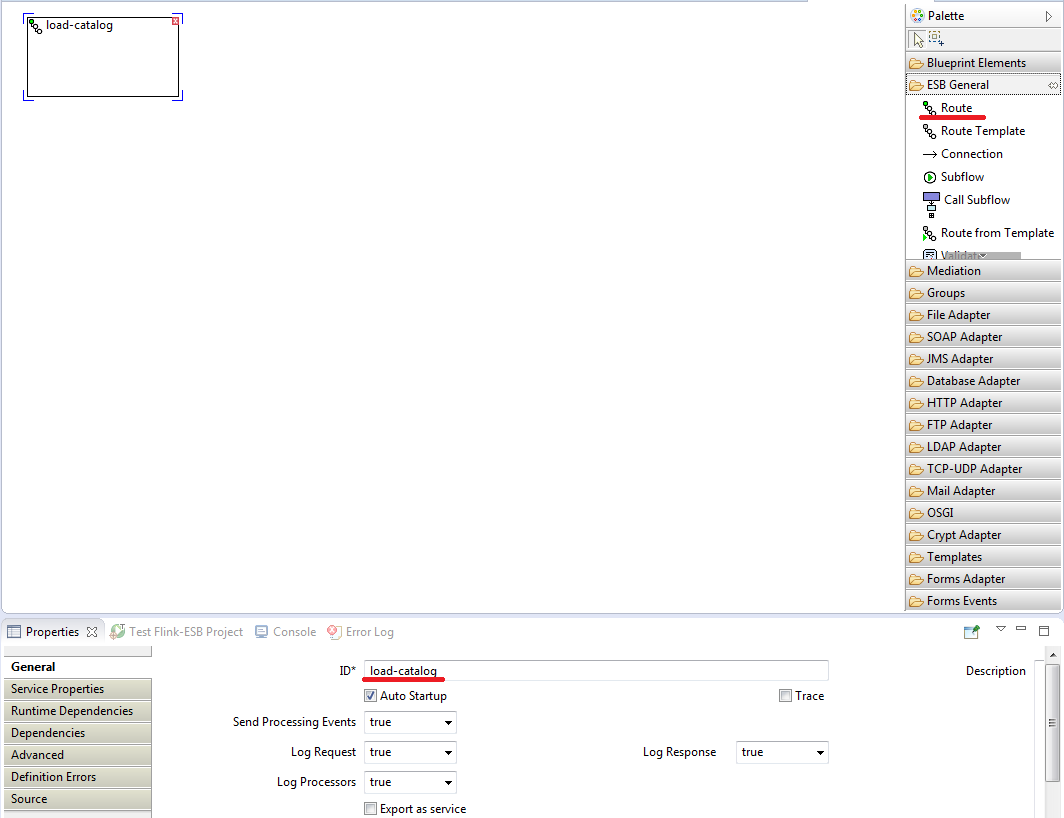
 Click "Save Changes" to save route properties.
 Select "Timer" component within "Mediation" palette, and drop it onto route. Make sure "Trigger-Type" is SINGLE_EXECUTION. Type 1 for "Trigger in seconds after start" parameter:
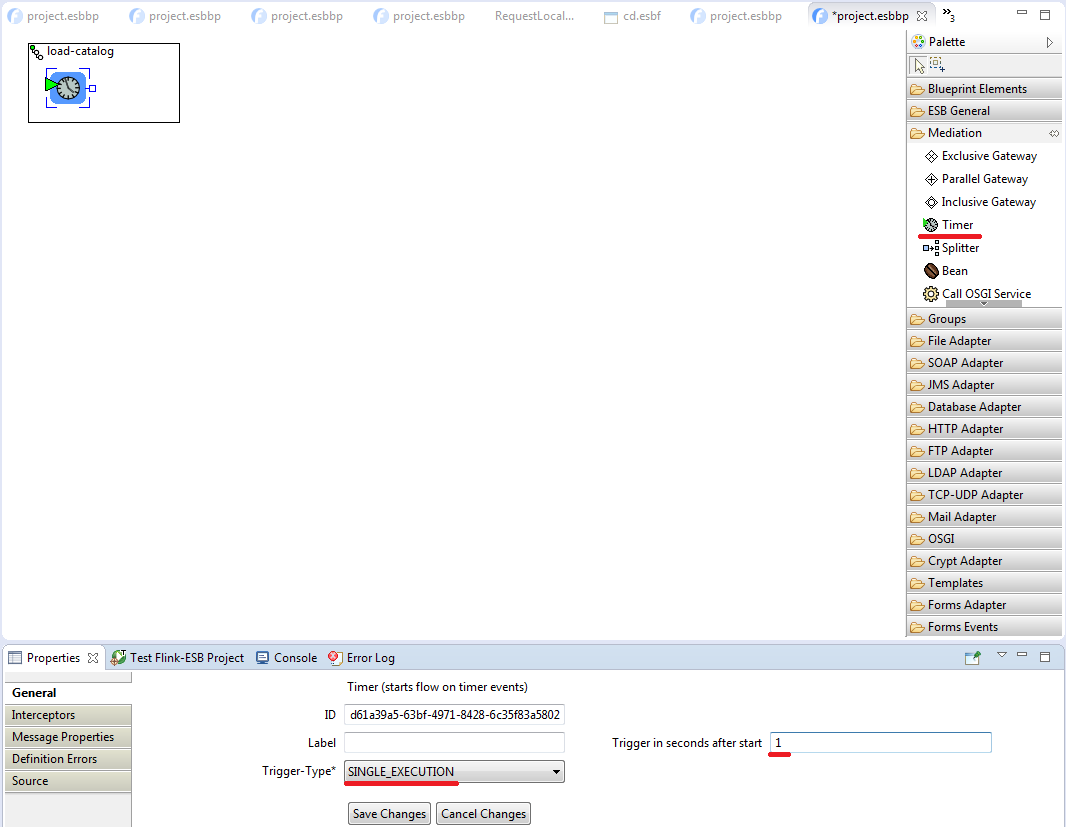
 Click "Save Changes" to save timer properties.
 Select "Read File" component within "File Adapter" palette, and add it to the route. Click on the left most button beside "Filename" field to open "File selection dialogue". Select "cd_catalog.xml" file:
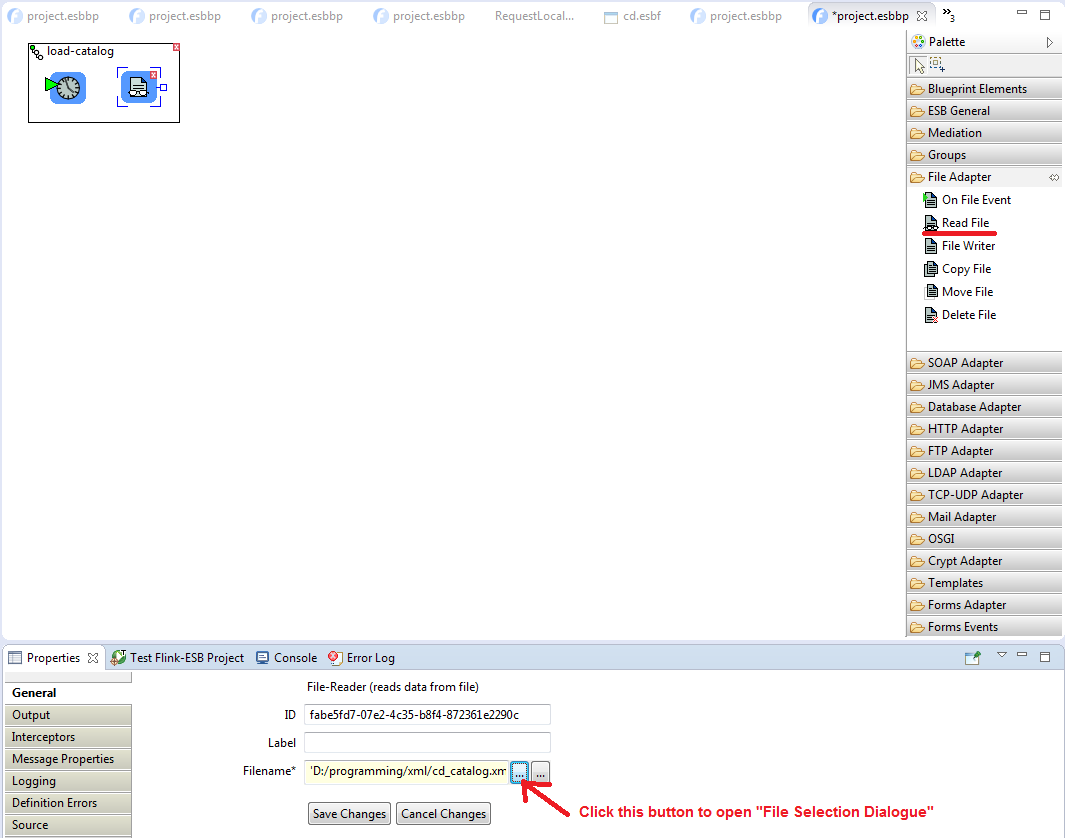
 Click "Save Changes" to save file reader properties.
 Select "Set Variables" component from "ESB General" palette, and add it to the route. Click on "Add Vaiable" button and type data as on picture below:
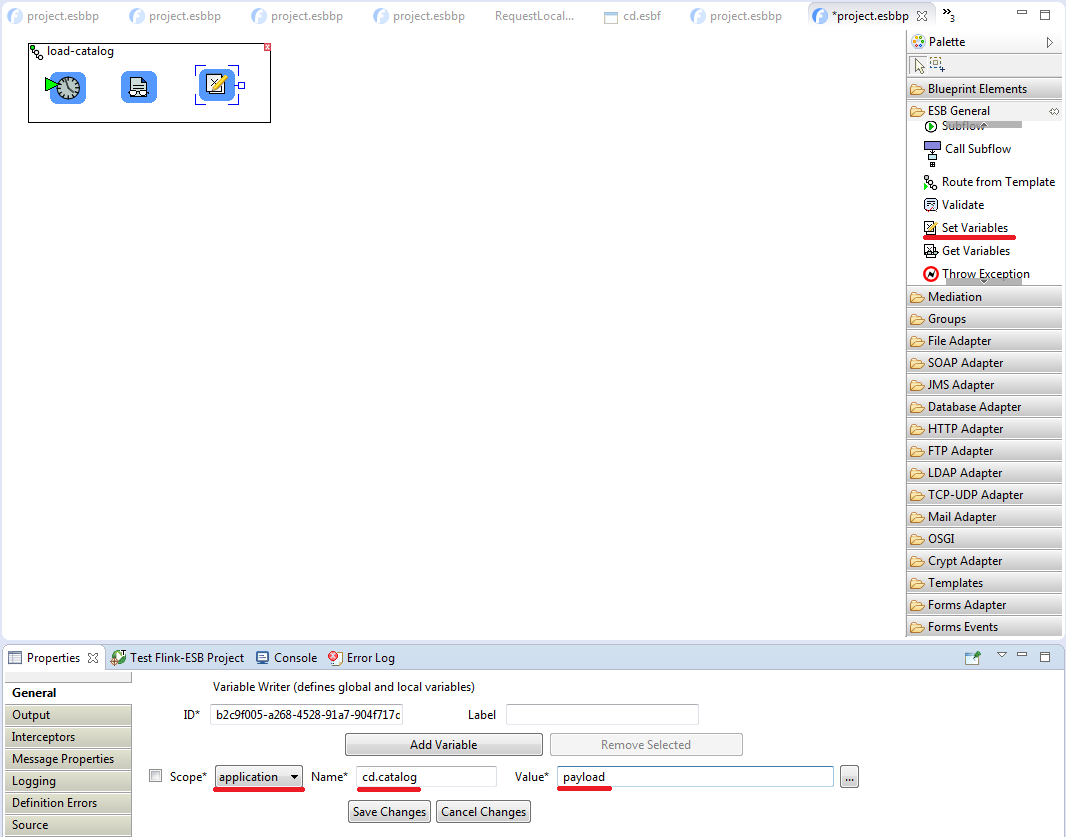
 Click "Save Changes" to save variable writer properties.
 Connect route nodes as on picture below:

 Select connection link between "File Reader" and "Set Variables" components. Click on "Payload Types" tab in properties window. Now type java.lang.String in the text field:
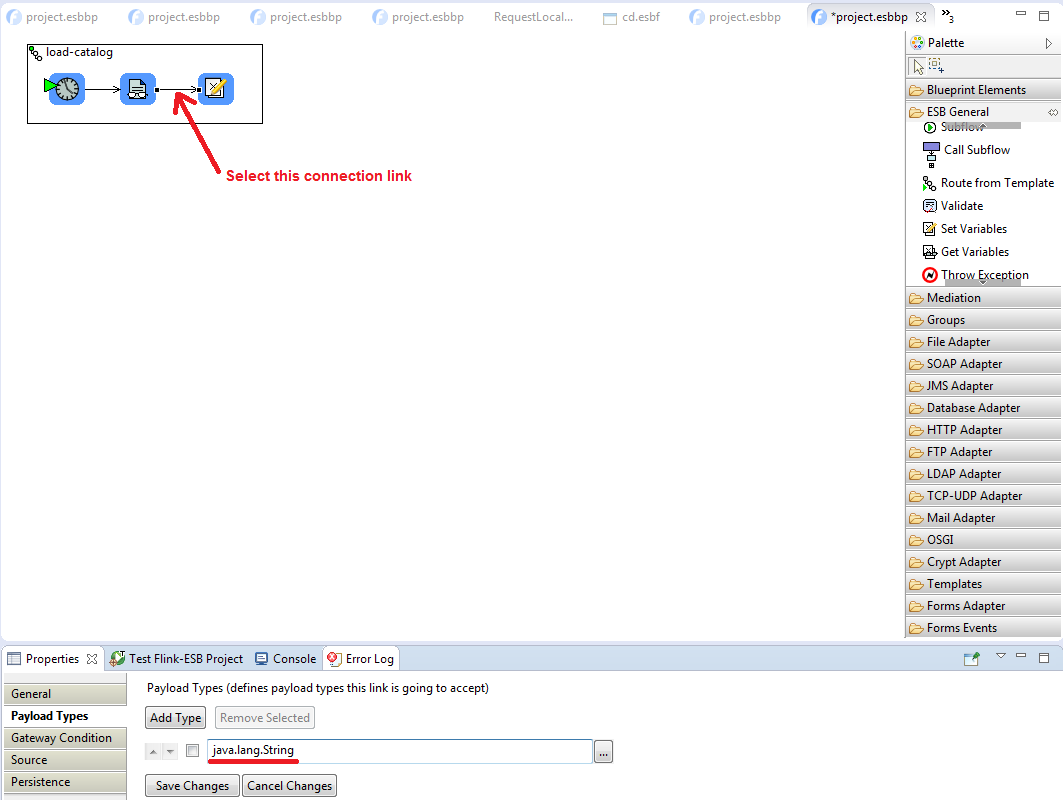
 Click "Save Changes". A small "T" letter must appear above the link:

If one or multiple payload types are assigned to a connection link, Flink-ESB checks the payload of the message passing the link. If it is of type provided in payload types, the message is passed. If it's not - Flink-ESB tries to convert a payload to one of provided payload types using built-in and custom type converters. If no converter can be found - an error is thrown
Step 3: verifying route functionality using Flink-ESB Admin Console
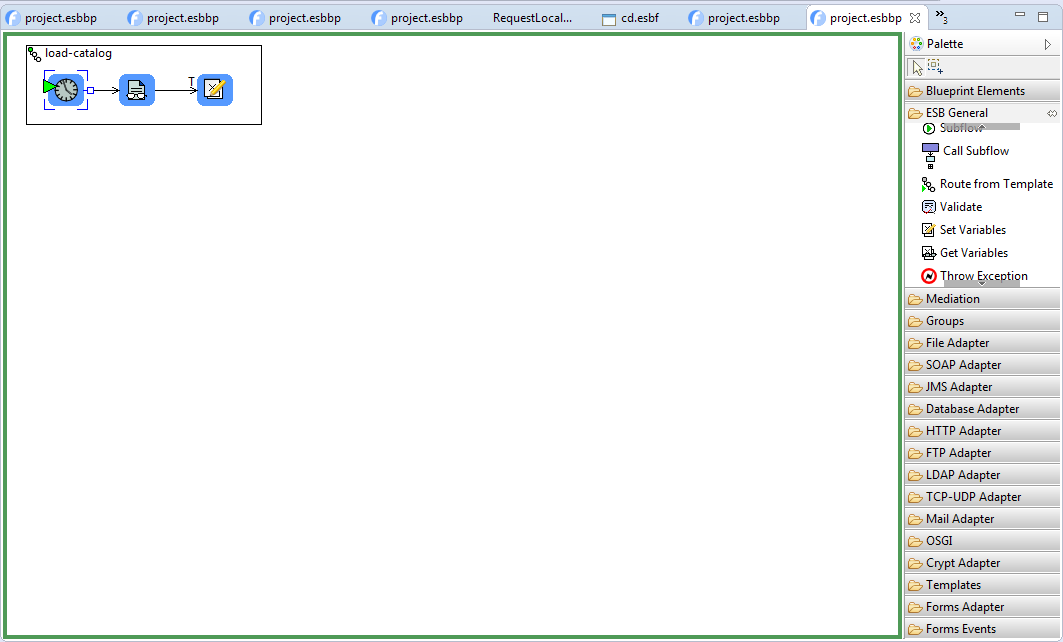
 Save project file in Flink-ESB Editor. Now let's start the project and verify the functionality of the route. Select "Run" -> "Run Project in Test Mode" in main menu, or right click somewhere on editor canvas and select "Run Project in Test Mode", or click
 If all goes well, you should see a green rectangle surrounding a project canvas:
 Go to Flink-ESB Admin Console in the browser using this url: https://192.168.0.199:8443/console/start (replace IP address with your local IP). Login into the console. Default username/password is admin/admin.
 Click on "Application Overview" to expand it, then click on triangle on the left side of instance name. Now you should see an application with name "flink-forms-project". Click on the small triangle to expand components of the project. Click on "Routes" to expand it. Now you should see a route with name "load-catalog". Make sure it's statistic is as on picture below:
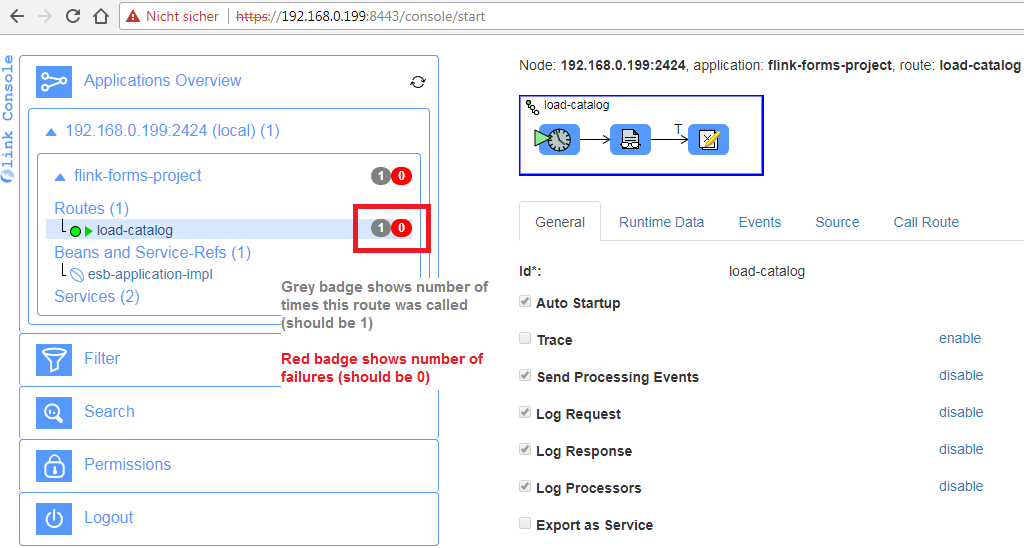
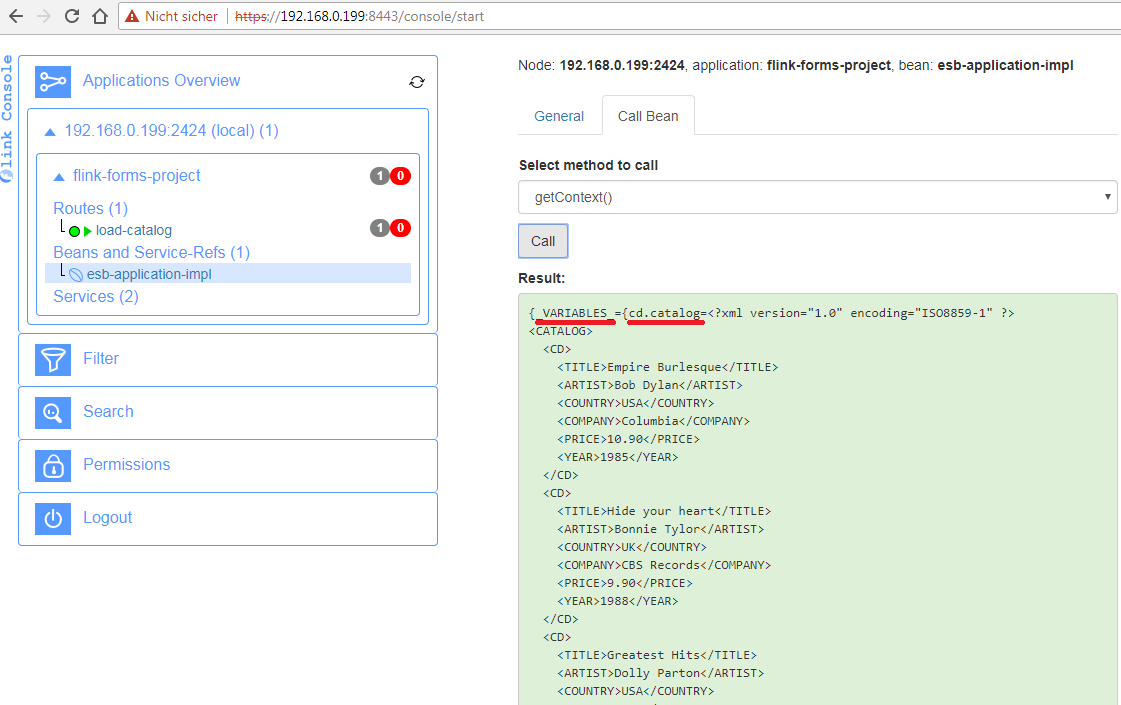
 Now let's make sure a content of CD catalog XML file is stored in application's context.
 Click on "Beans and Service-Refs" in Flink-ESB Admin Console to expand it (if it is not expanded yet). Select "esb-application-impl" bean. Click on "Call Bean" tab on the properties panel (on the right side of the page). Select getContext() method in the select box and click "Call". You should see a content of application's context:
Step 4: adding HTTP server to the project
 We are going to use HTTP servlet to serve Flink-Forms page. In order to use servlet, we need HTTP server. If there are other projects already using HTTP server, you can attach to that HTTP server without creating a new server in this project. But let's assume we have to create a new instance of HTTP server in this project.
 Add "HTTP Server" component from "HTTP Adapter" palette to the project. Enter it's data as on picture below:
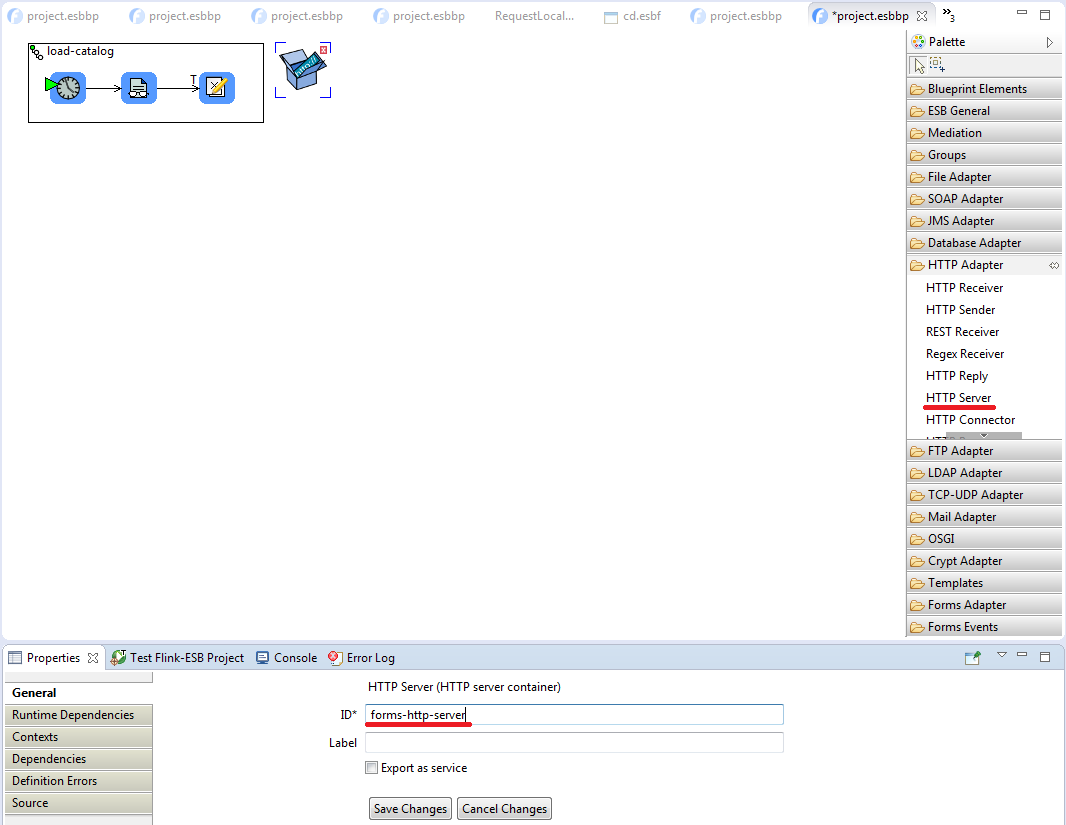
 Click "Save Changes" to save HTTP server properties.
 Add "HTTP Connector" component from "HTTP Adapter" palette to the project. Enter it's data as on picture below:
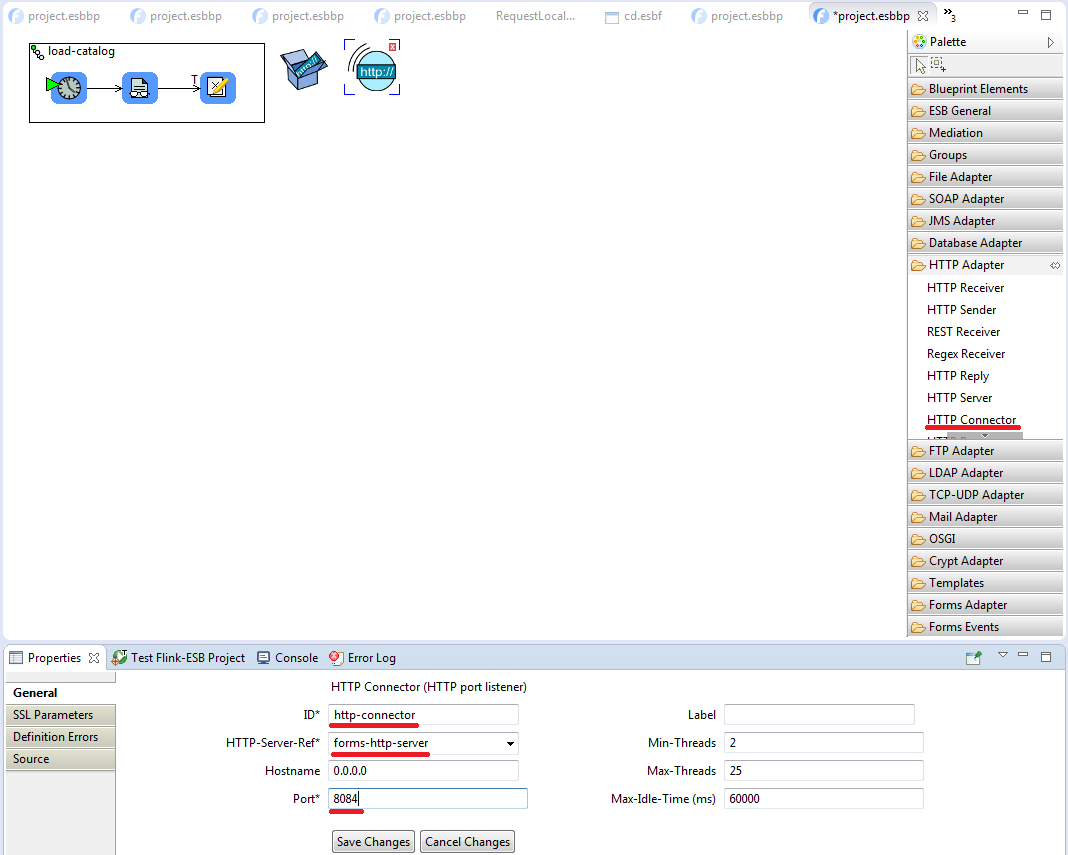
 Click "Save Changes" to save connector's properties.
Step 5: adding route serving HTTP GET request
This will be our main route serving HTTP GET requests and showing CD data
 Add a new route to the project in Flink-ESB Editor. Enter its "ID" property as show-cd. Click "Save Changes".
 Now add following components to the route from left to right: 1) "REST Receiver" from "HTTP Adapter" palette; 2) "Get Variables" from "ESB General" palette; 3) 2 "Transformers" from "Mediation" palette. Connect route nodes as on picture below:

 Select "REST Receiver" within the route and define its properties as on picture below:

Make sure to define Url as /cd/{title}. "title" must be enclosed in curly braces. This creates a dynamic REST URL - any data in place of {title} in the URL will be saved in the message as message property with name "title"
 Click "Save Changes". Select "Get Variables" within the route, click "Add Variable" button in the properties window, and define its properties as on picture below:

Make sure variable name matches exactly the name of variable defined for "Set Variables" component in the first route !!!
This component reads XML file from application context (saved there by the first route after the application is started), and stored this XML in the message property with name "cd.catalog", so that subsequent route nodes can use that data.
 Click "Save Changes". Select the first "Transformer" within the route and enter its properties as on picture below:

This "Transformer" applies XPATH expression to XML CD catalog (stored in "cd.catalog" message property by the previous route node). It searches for the "/CATALOG/CD/TITLE" element matching the value provided in HTTP URL (in place of {title})
The third parameter "true" tells "xpath" function to return data found as XML NodeList
 Click "Save Changes". Now select the second "Transformer" and enter data as on picture below:

 This is needed to convert message payload from XML NodeList to String format. Click "Save Changes" and save project file.
Step 6: verifying route functionality by calling HTTP URL in the browser
 Go to browser and type following URL: http://192.168.0.199:8084/cd/Hide your heart. "Hide your heart" is one of CD titles from the XML CD catalog.
 You should get an XML response in following format:
<CD>
    <TITLE>Hide your heart</TITLE>
    <ARTIST>Bonnie Tylor</ARTIST>
    <COUNTRY>UK</COUNTRY>
    <COMPANY>CBS Records</COMPANY>
    <PRICE>9.90</PRICE>
    <YEAR>1988</YEAR>
</CD>
 Try other titles from CD catalog and make sure you get correct responses in XML format.
Step 7: defining Flink Form page to display CD data
Now we have HTTP service displaying CD data for a given title. The only thing left is to display this data in requested form.
We could create form file in any existing project folder, but to have different kinds of data in different location, we will create a separate folder to hold form files.
 Go to Flink-ESB Editor and right click on the project in Project Explorer. Select "New" -> "Folder" in the context menu. Name the folder "forms".
 Open project's "build.properties" file in the Editor by double clicking it. Select checkbox beside "forms" folder in "Binary Build" panel:
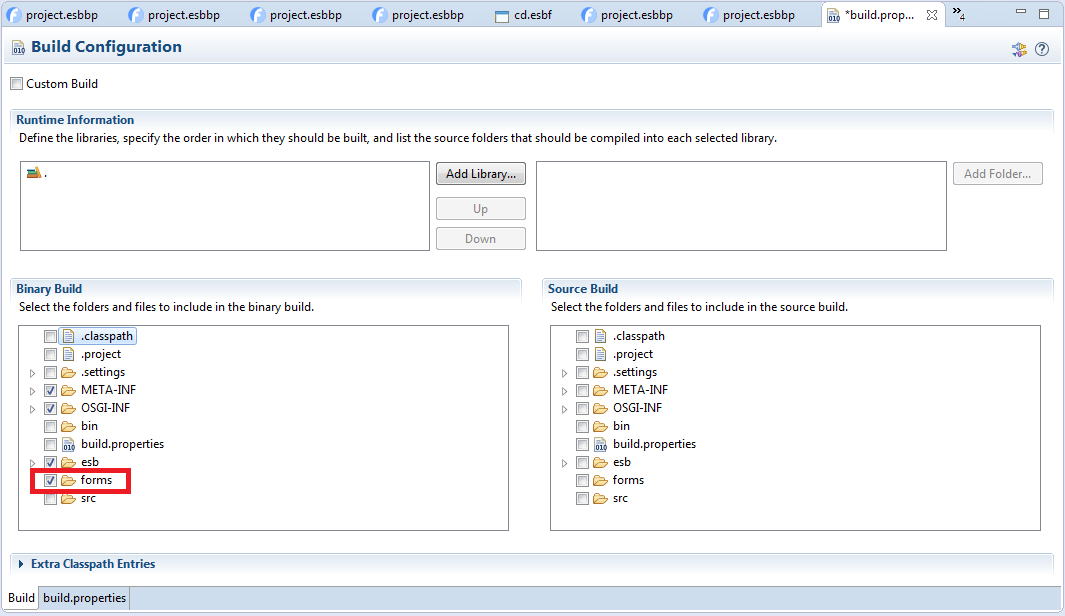
 Save "build.properties" file and close it. With that change we make sure, that "forms" folder (which will hold forms files) is added to the application jar when it is build.
 Now right click "forms" folder in Project Explorer and select "New" -> "File" from the context menu. Name the file "cd.esbf" and click "Finish"
 As soon as you create the file, it should be opened automatically in Flink-Forms Editor:
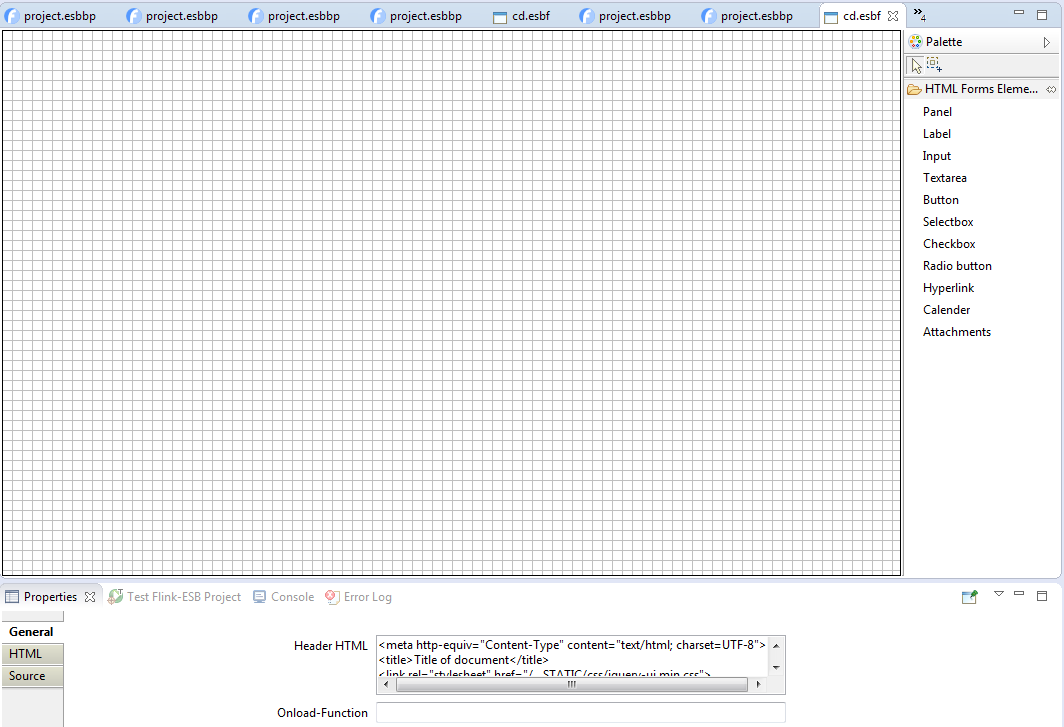
It is required to give esbf extension to a file to associate it with Flink-Forms Editor !!!
 Now let's start creating the forms page.
 Select "Panel" from "HTML Forms Elements" palette and drop it onto Forms Editor canvas. Go to properties page and click on "Position and Size" tab. Provide data as on picture below:
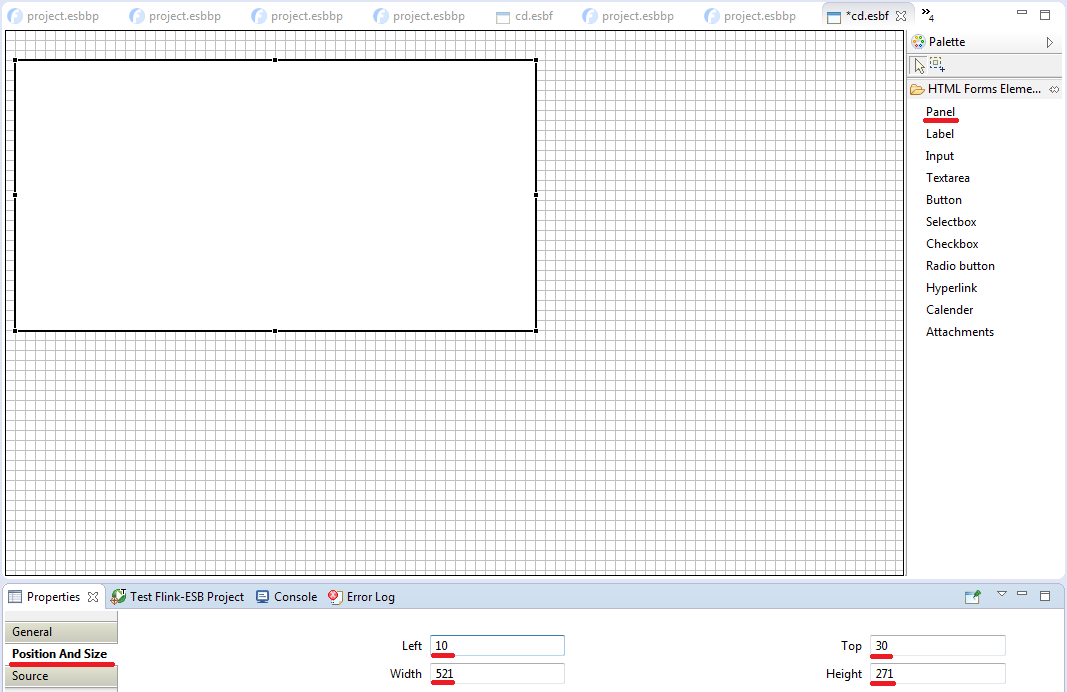
 Click "Save Changes". Select "Input" from "HTML Forms Elements" palette and place it onto "Panel". Enter its properties as on picture below:
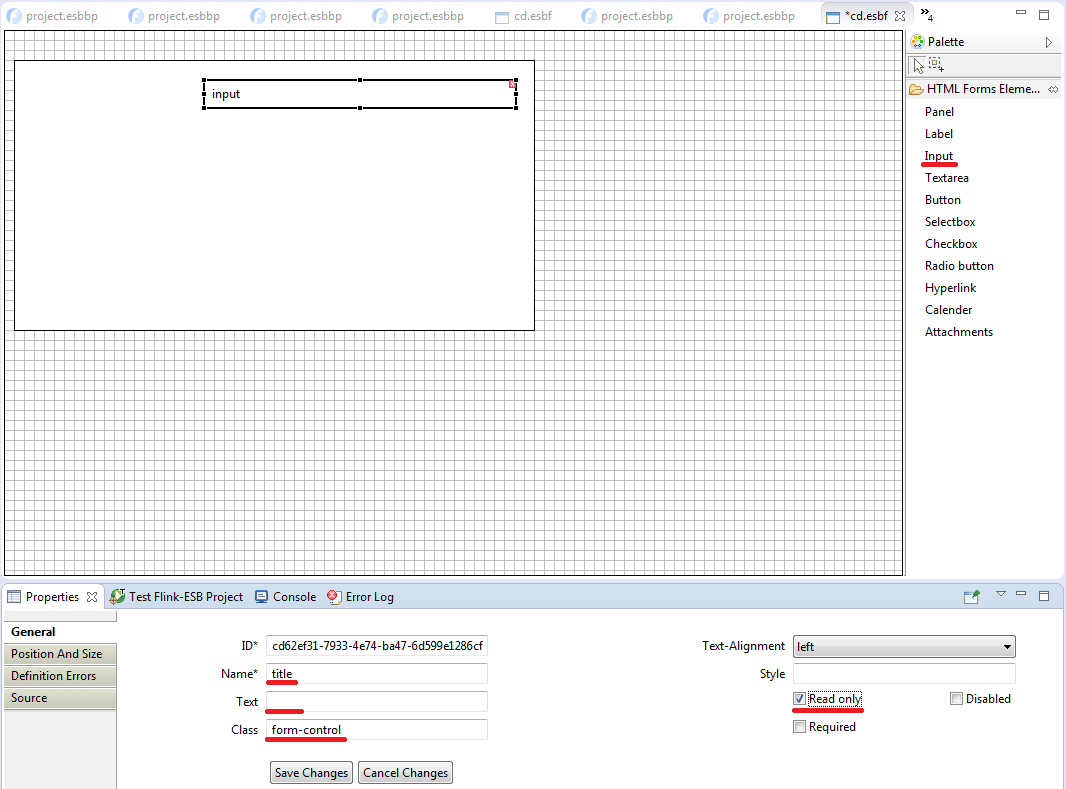
 Click "Save Changes". Select "Label" from "HTML Forms Elements" palette and place it onto "Panel" to the left of "Input" component. Enter its properties as on picture below:
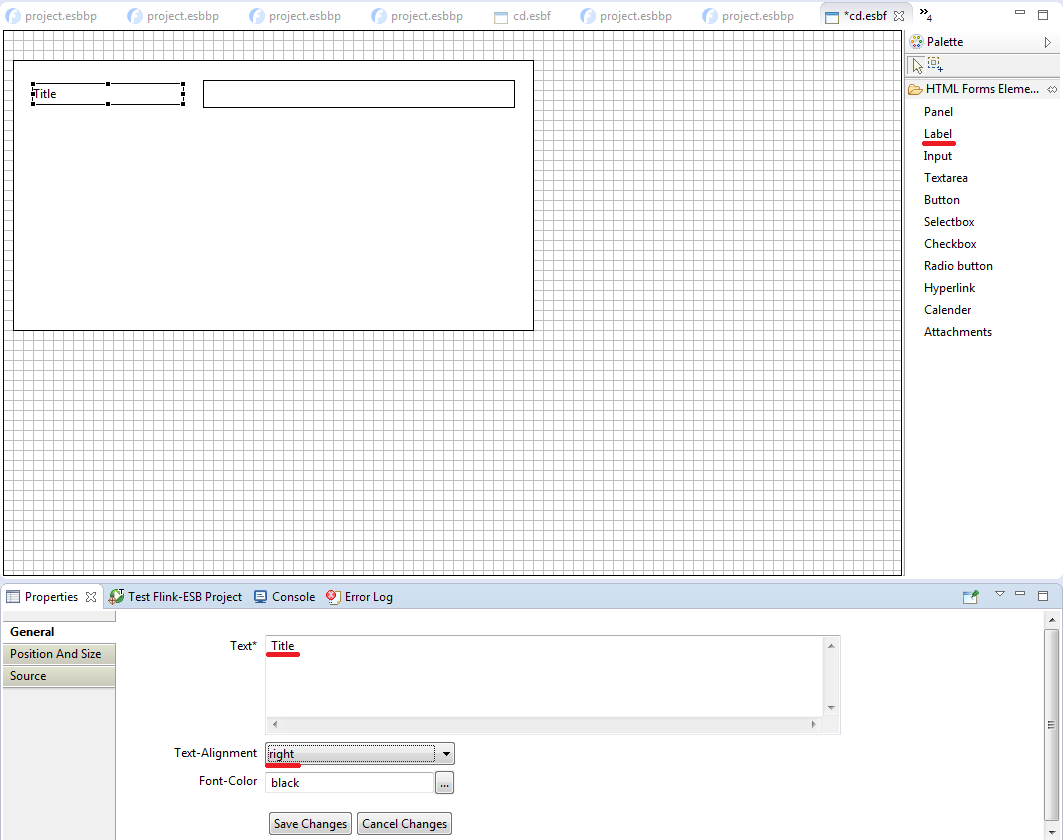
 Click "Save Changes". Now add the second "Input" component below the first one, and enter its properties as below:

 Click "Save Changes". Add the second "Label" to the left of the second "Input" and type its properties as on picture below:

 Click "Save Changes". Now add the third "Input" component below the first one, and enter its properties as below:

 Click "Save Changes". Add the third "Label" to the left of the third "Input" and type its properties as on picture below:

 Click "Save Changes". Continue adding other "Input" components with their respective "Label" components for "company", "price" and "year" fields.
 At the end you forms file should look like the one below:
 Save forms file
Step 8: adding Viewer Task to the route to display HTML data in forms file
 Go back to Flink-ESB Editor. Add "Viewer Task" from "Forms Adapter" palette to the "show-cd" route. Connect it with the second "Transfromer" as on picture below:

 Provide "Viewer Task" properties as on picture below:

 Click "Save Changes", then select "Parameter Mappings" tab in the properties window.
 Right click somewhere in properties window and select "Add New ParameterMapping" from the context menu. This adds a new entry with defauld values for parameter name and parameter value.
 Click on parameter name to make it editable. Type title as parameter name. Click on parameter value to make it editable. Type xpath(payload, '//TITLE') as parameter value.

 Right click again to add the second parameter mapping. Type artist as parameter name, and xpath(payload, '//ARTIST') as parameter value.
 Continue adding other parameter mappings until you get the data as on picture below:

Step 9: verifying modifications using browser
 Save the project file and start the project.
 Go to browser and type following URL: http://192.168.0.199:8084/cd/Hide your heart. "Hide your heart" is one of CD titles from the XML CD catalog.
 You should get a response as on picture below:
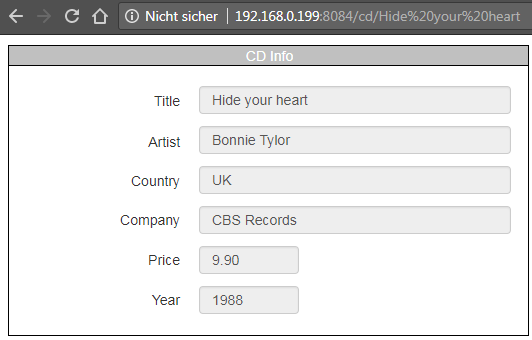
 Go ahead and try the service for the other titles from XML CD catalog.
