Flink-ESB Tutorials
Use case: create "customer-api" application to store/retrieve data in DB over HTTP (part 1)
Short description: Create Flink-ESB application offering 4 HTTP services to read / insert / update / delete customer data in the database.
Customer data is stored in the database in one table, called CUSTOMER.

In this tutorial Oracle database is used to store customer data. But you can use any other database which has a JDBC driver.
Part 1: create new application and develop HTTP GET service reading data from database
In the first part of the tutorial we will:
create a database table, that will be used to store and retrieve data in this tutorial >>
create a new project in Flink-ESB Editor >>
add database connection pool to read/write in the database >>
create a route to read data from the database >>
set up a Validate component within a route to check incoming XML on presence of numeric "id" message property >>
set up a Data reader component within a route to execute SELECT SQL statement in DB using bind variables >>
start project in Flink-ESB Editor and test it using Flink-ESB Admin Console >>
set up a Transformer component within a route to convert a message from array list to XML >>
create error handler for the route >>
set up an Exclusive Gateway to check the data returned from DB, and either send it to "Transformer" (if exactly one row was found), or to one of two "Throw Exception" components >>
set up a Throw Exception component within a route to raise an exception in case more then one row in DB is found >>
set up a Throw Exception component within a route to raise an exception in case data in DB is found >>
add HTTP server, so that we can call services over HTTP >>
create a route handling HTTP GET request and calling another route, which reads data from the database >>
set up a REST Receiver starting component within a route to start route on every incoming HTTP GET request >>
set up a Call Subflow component within a route to call "get-customer" subflow >>
Following Flink-ESB components are used in this part of tutorial:
First level components:
 DB Connection Pool : used to create a pool of connections to the database. Route nodes reading or writing in DB must define a reference to DB connection pool.
 HTTP Server : represents an instance of an empty HTTP server container. Add one or multiple "HTTP-Connectors" to create HTTP ports on that server instance.
 HTTP Connector : used always together with "HTTP Server". Represents one port, where HTTP server accepts HTTP or HTTPS requests.
 Route : represents a sequence of activities, performed upon the message. Route contains route node components connected with links. Route node activities and links define the functionality of the route. Route can either have a starting event (received HTTP request, timer etc.), or it can be called from other routes (in this case such route is called subflow).
Route nodes:
 Subflow : starting route node, used to mark beginning of the subflow. Subflow is kind of route, which does not have its own trigger (HTTP request, timer etc.). Every route, that does not have a specific starting event, must start with this component.
 Validate : used to validate a message. Can parse XML against schema file, and/or validate against one or multiple custom rules.
 Transformer : used to transform a message in different format.
 Data reader : used to run SELECT SQL statements in the database. Must refer to "DB Connection Pool".
 Exclusive gateway : outgoing exclusive gateway (has one incoming connection link and multiple outgoing links) is used to route a message to different route nodes depending on some conditions.
 Throw Exception : used within a route to throw a custom exception. It is always the last route node component within a sequence flow. It does not have outgoing connection links.
 REST Receiver : starting route node, used always at the begin of the route as starting event. Must refer to "HTTP Server". Triggers after receiving HTTP request with configured HTTP method + URI
 Call Subflow : used to call a subflow (another route, which has a "Subflow" component as a starting event).
See also:
Part 2: add a service to insert data into DB using HTTP POST request
Part 3: add a service to update data in DB using HTTP PUT request
Part 4: add a service to delete data in DB using HTTP DELETE request
Part 5: add project variables to make environment specific data configurable
Step 1: creating database table to keep customer data
 To create a CUSTOMER table in Oracle DB, connect either to some existing DB schema, or create a new one. Now run this SQL statement to create a table:
CREATE TABLE CUSTOMER (
	CUSTID NUMBER(8) NOT NULL,
	CREATED TIMESTAMP (8) DEFAULT systimestamp,
	NAME VARCHAR2(256) NOT NULL,
	CITY VARCHAR2(256) NOT NULL,
	ZIP VARCHAR2(256) NOT NULL,
	CONSTRAINT CUSTID_PK PRIMARY KEY (CUSTID)
);
 Also an Oracle sequence will be used, to generate CUSTID. So run also this SQL statement to create a sequence:
CREATE SEQUENCE CUSTIDSEQ MINVALUE 1 MAXVALUE 999999999999999 INCREMENT BY 1 START WITH 1 NOCACHE NOORDER NOCYCLE;
Step 2: creating a new Flink-ESB apllication in Flink-ESB Editor
 Open Flink-ESB Editor and select "File -> New -> Project" in the main menu. Double click "Flink-ESB" folder to expand it, select "Create New Flink-ESB Project" and press "Next"

 This opens a "New Flink-ESB Project" wizard. Enter data as on picture below: "Project Name" : customer-api, unselect "Use default location" checkbox and select a folder where a project should be created:
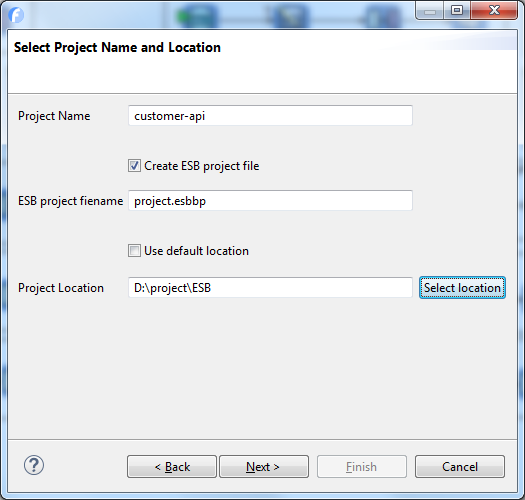
 Click "Next" and type some name in "Provider" field, after that click "Finish". This should create a new Flink-ESB project and open a file called "project.esbbp" in the main editor pane. This is where we will create all the components of the application.
Step 3: creating a DB connection pool in Flink-ESB Editor
 Click on "Database Adapter" drawer on the components palette to the right of the main editor pain. Click on "Database Connection" component, now move mouse pointer over editor canvas and click with the left mouse to put "Database Connection" component onto canvas. Provide properties of connection pool as on picture below (adjust underlined values to your database values):
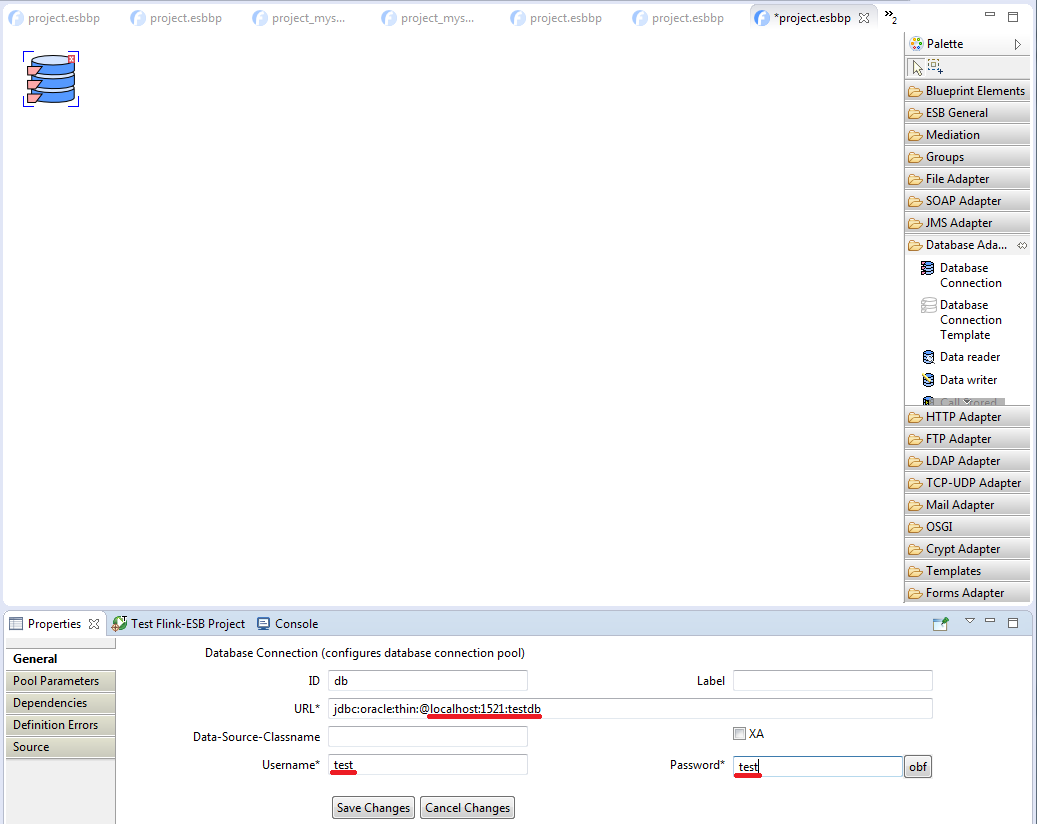
 Later we will replace underlined values with project variables. Click "Save" in the "Properties" window on the bottom of the editor.
Step 4: creating a route to select data from the database in Flink-ESB Editor
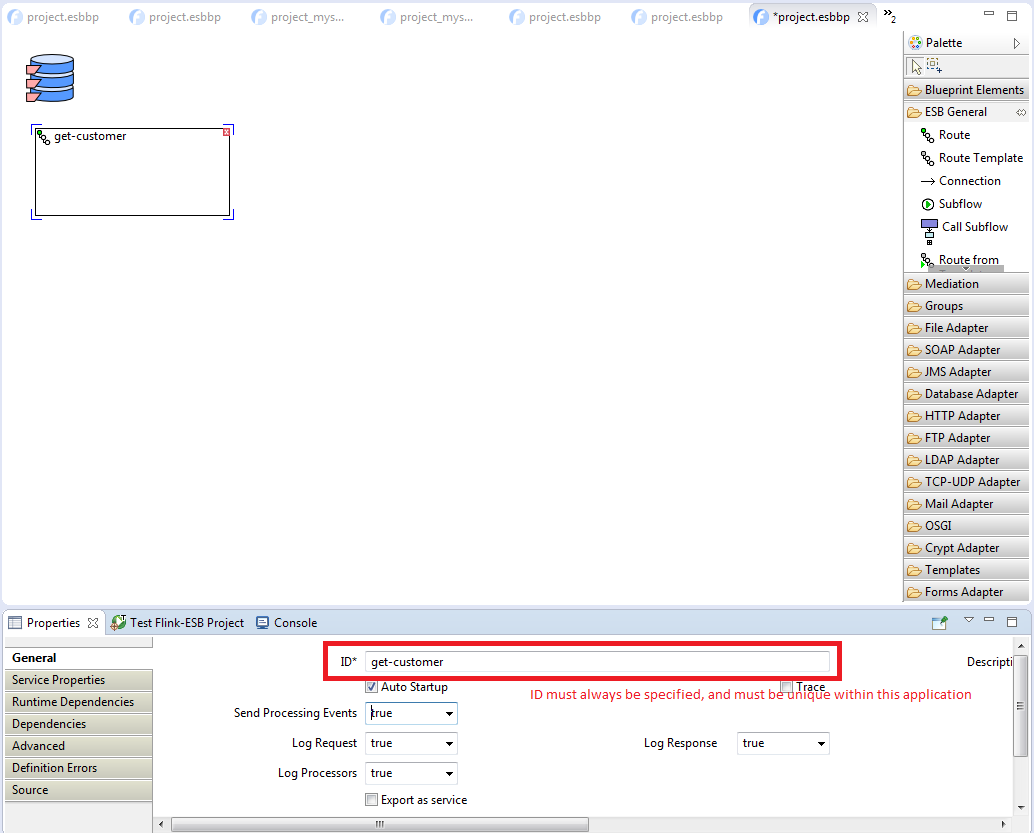
 Click on "ESB General" palette drawer to expand it, and place a "Route" on editor canvas. Instead of just clicking on the canvas, you can click and drag a rectangle to create a route of a custom size. Type "get-customer" as "ID" property and click "Save":
 Click on "Subflow" component within "ESB General" palette and place it within the route. Now click on "Validate" component in the same palette (scroll down within palette drawer if you cannot see it) and place it within the route to the right of "Subflow" component.
 Click on "Database Adapter" palette drawer to expand it, place a "Data reader" component within the route to the right of "Validate" component. Resize the route, so that all components are visible.
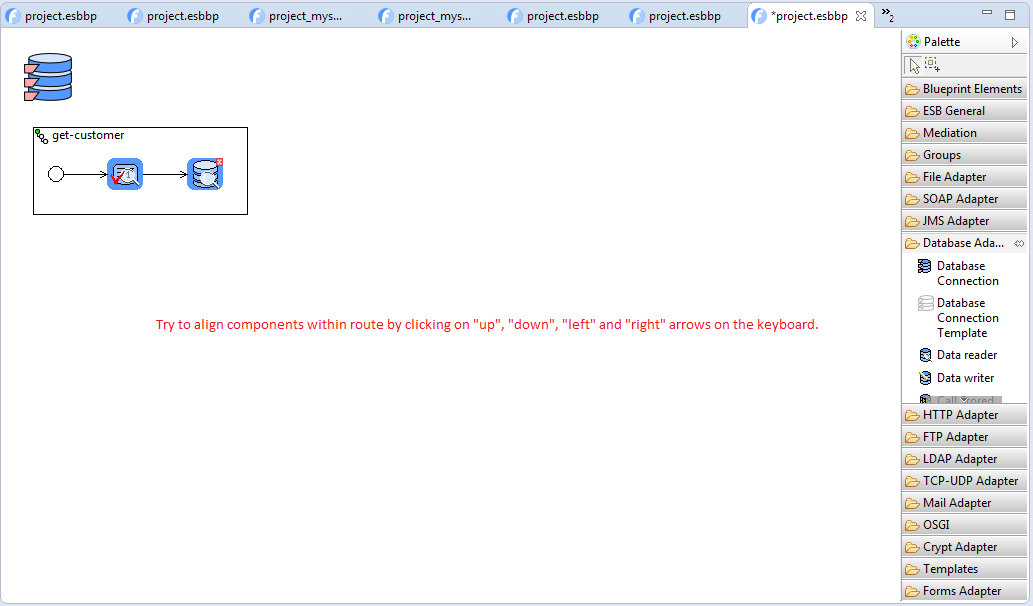
 Select "Subflow" within the route. You should see now a small rectangle on the right side of the selected component. Click and drag a mouse pointer from that rectangle to the "Validate" component and release mouse over "Validate". This should create a "link" between those 2 components. Now connect "Validate" with "Data reader". You should have a route as on picture below:
 Click on "Validate" component within a route, and select "Rules" tab in the properties window. Click "Add Rule" and type property['id']!=null in "Rule-Expression" field. Click "Add Rule" again and type the second expression: Integer.valueOf(property['id'])!=null. Click "Add Rule" again and provide the third expression: property['id']>0:

 Click on "Save Changes".
 Now select "Data reader" component within a route and enter its properties as on picture below: "DB-Connection-Ref" : db, "SQL" : 'select * from customer where custid=?'

 Click "Save Changes". Now click on "Bind Variables" tab, click "Add Parameter" and provide data as on picture below: "Param-Type" : NUMERIC, "Param-Value" : property['id']:

 Click "Save Changes". Now save the file.
Step 5: starting a project in Flink-ESB Editor and calling route in Flink-ESB Admin Console
 Now all is ready to make a first test. Select "Run" -> "Run Project in Test Mode" in main menu, or right click somewhere on editor canvas and select "Run Project in Test Mode", or click
  button in main toolbar to start a project.
 If all goes well, you should see a green rectangle surrounding a project canvas:
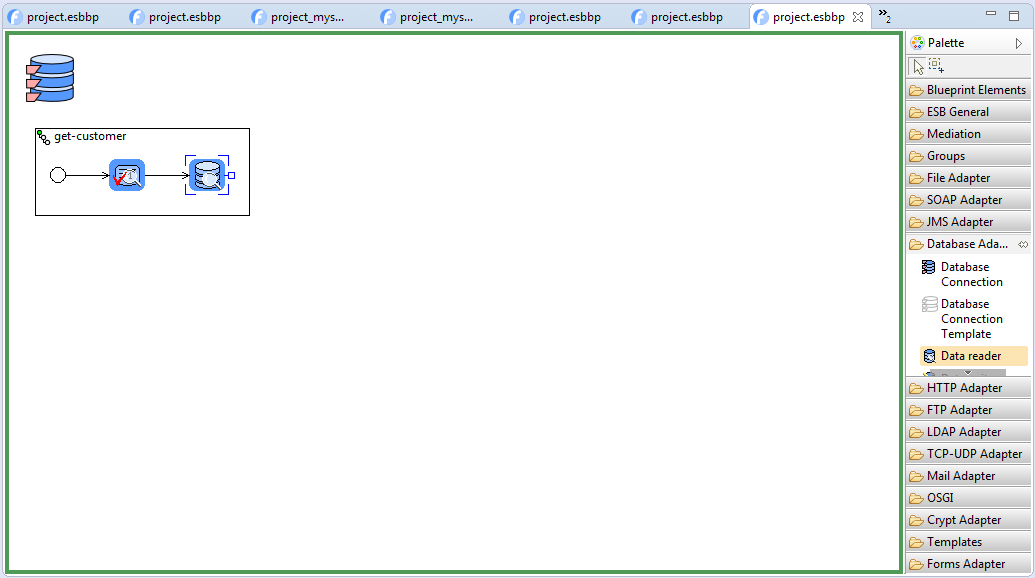
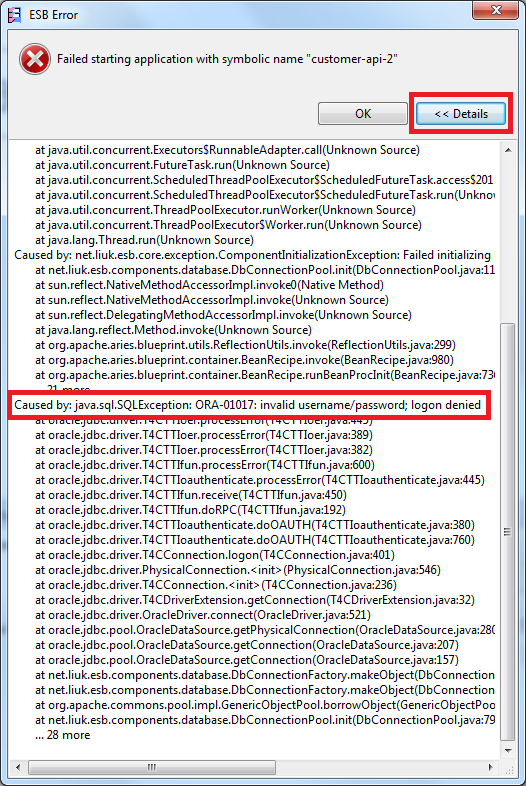
 It means, a project is started. If you get an error message, check properties of DB connection pool and route components. Error message should give a hint what exactly is wrong:
 When the project is started, go to url https://localhost:8443/console/start in the browser. Login to Flink-ESB Admin Console with default username/password: admin/admin. Click on "Application Overview" to expand it, then click on triangle on the left side of instance name. Now you should see an application with name "customer-api". Click on the small triangle to expand components of the project. Click on "Routes" to expand it. Now you should see a route with name "get-customer". Click on it to see its details on the right side of Admin Console:
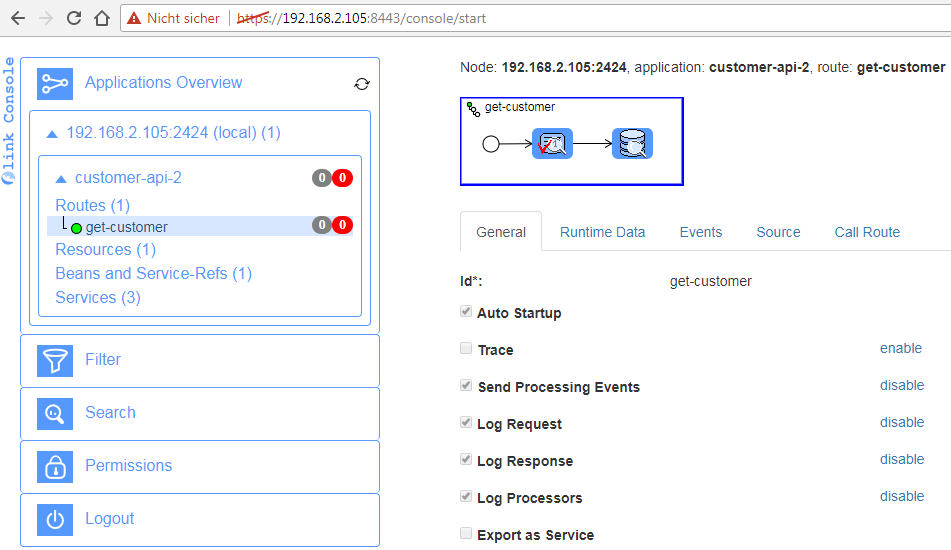
 Click on "Validate" component to see its properties, then check properties of "Database Reader". Flink-ESB Admin Console provides the full visibility of the structure of the routes.
 Click on route to see its properties. Now click "Call Route" tab. Click "Call" button. You should get a response in light red colour (which means: it is failed). Check the value of "error" message property in the reply:
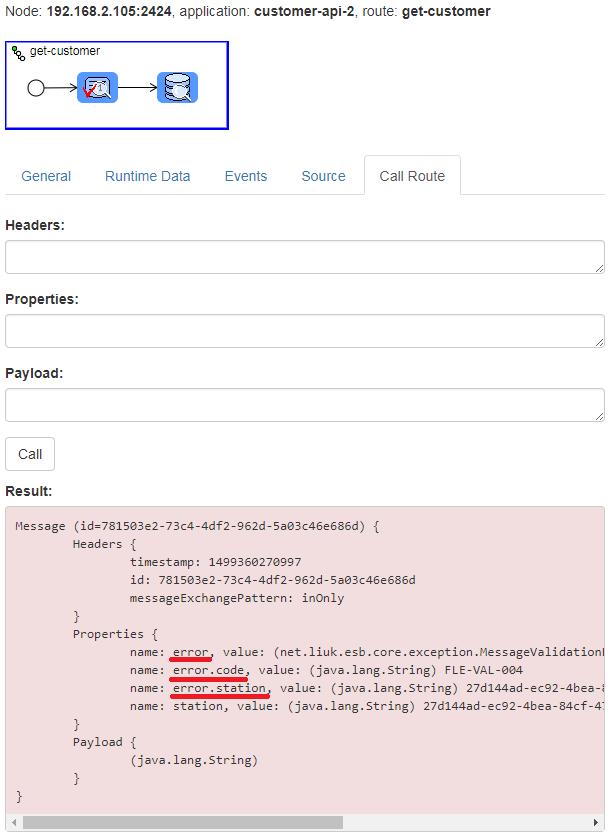
 You should get an error: Failed validating rule: CUSTOM: property['id']!=null. It is because we've devined 3 rules for the "Validate" component (click on it again in Admin Console or in the Editor to see those rules). Now type following in "Properties" field within "Call Route" page: [ 'id' : 1 ], click "Call" button. This time you should get a reply in light green colour (which means success):
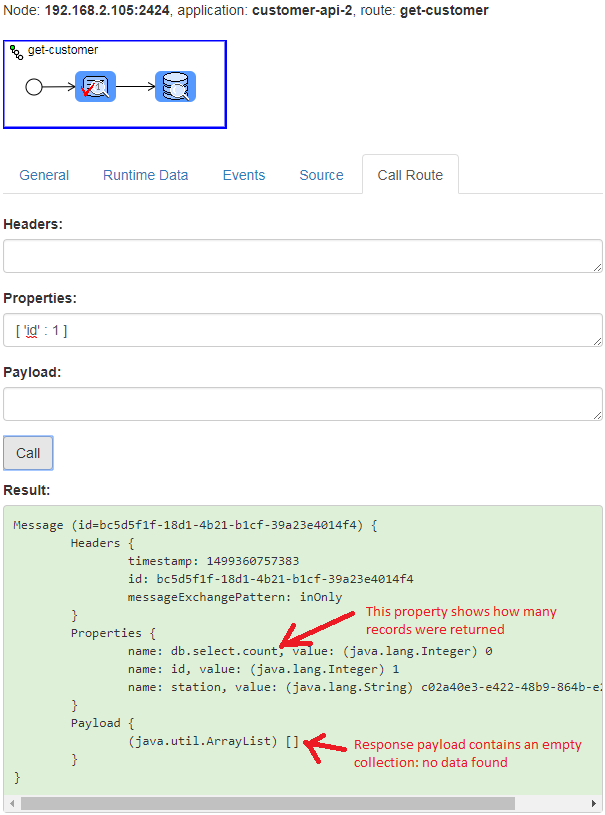
 Response contains some important properties. "db.select.count" shows how many records were returned by the last DB read. Let us insert now a record into the database:
insert into CUSTOMER (CUSTID, NAME, CITY, ZIP) values (CUSTIDSEQ.nextval, 'Darth Vader', 'Cloud City', '12345');
 Now call a route again. Make sure to specify property "id" with the same value as "CUSTID" of the inserted record. You should get now response as on picture below:
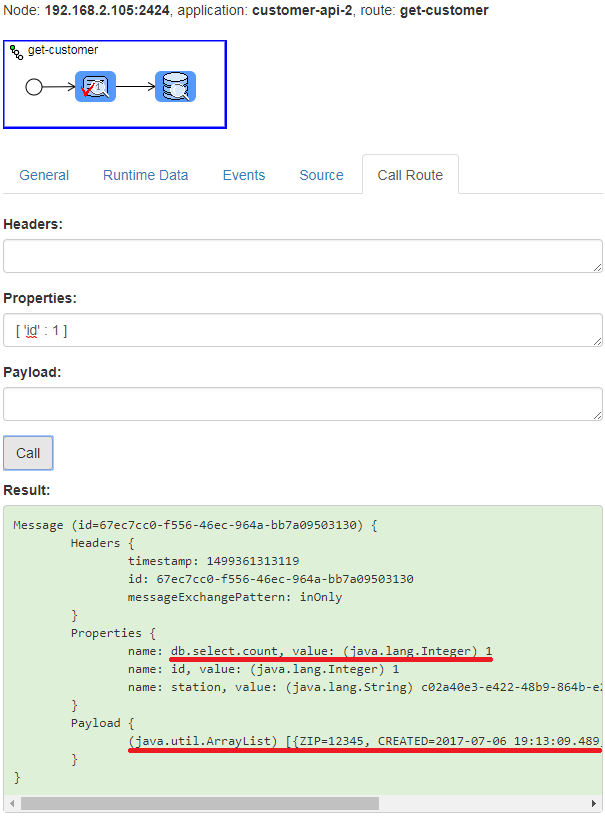
 As you can see, message property "db.select.count" has value 1. And message payload contains one entry in the collection. This one entry is actually a hashmap, where keys are names of table columns, and values are values of those columns.
 Let's now modify a route to output data in some custom format. Go to Flink-ESB Editor, expand "Mediation" palette drawer and add "Transformer" to the route. Resize the route if needed. Connect "Data reader" with "Transformer". In properties window make sure custom is selected as "Type". For "Custom-Expression" enter following:
'<customer>
	<custid>'+payload[0]['CUSTID']+'</custid>
	<created>'+payload[0]['CREATED']+'</created>
	<name>'+payload[0]['NAME']+'</name>
	<city>'+payload[0]['CITY']+'</city>
	<zip>'+payload[0]['ZIP']+'</zip>
</customer>'
 The route should look now like on the picture below:

 Save project file and start the project again. Go to Admin Console and call a route again. Do not forget to enter [ 'id' : 1 ] in "Properties" textbox. Click "Call". The result should be now as below:
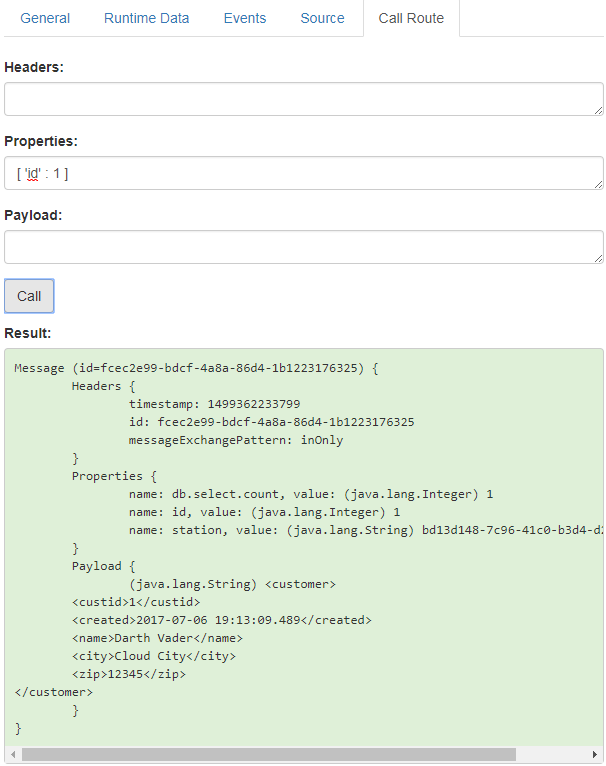
Let's now explain why we got a reply in that message format.
You remember, we've added a "Transformer" component to the route right after "Database reader". What this component does, it takes some expression (value "Custom-Expression" field in the Editor) and applies that expression to the message.
A bit shortened, this expression looks like: '<customer><custid>' + payload[0]['CUSTID'] + '</custid> ... '</customer>'.
Part in blue colour is just a literal expression, and "Transformer" passes it without any modifications. "payload" is an expression for an object stored in message payload. You remember, as we called a route without "Transformer", message payload was of type "java.util.ArrayList". So payload[0] would fetch the first row of array list, and as we remember it is a hash map. Expression payload[0]['CUSTID'] fetches the first row of array (which is hash map) and extracts the value of "CUSTID" field. Then it concatenates this value with the previous literal expression. And so it goes on, until we get XML document.
"Data reader" component in "Database Adapter" palette is able to output data in 3 different formats: array list, XML or JSON. Check "Output-Format" field of this component in Flink-ESB Editor
Step 6: creating a custom error handler for "get-customer" route
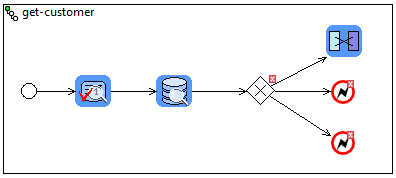
 Go to Flink-ESB Editor, expand "Mediation" palette, and add one "Exclusive Gateway", then expand "ESB General" palette, and add two "Throw Exception" components.
 Place "Exclusive Gateway" between "Data reader" and "Transformer". Place "Throw Exception" components after "Exclusive Gateway" below "Transformer". Connect components as shown on picture below;
 Click on connection link between "Exclusive Gateway" and "Transformer", click "Gateway Condition" tab in properties window, unselect "Default condition" checkbox and enter property['db.select.count']==1 in the condition textbox:
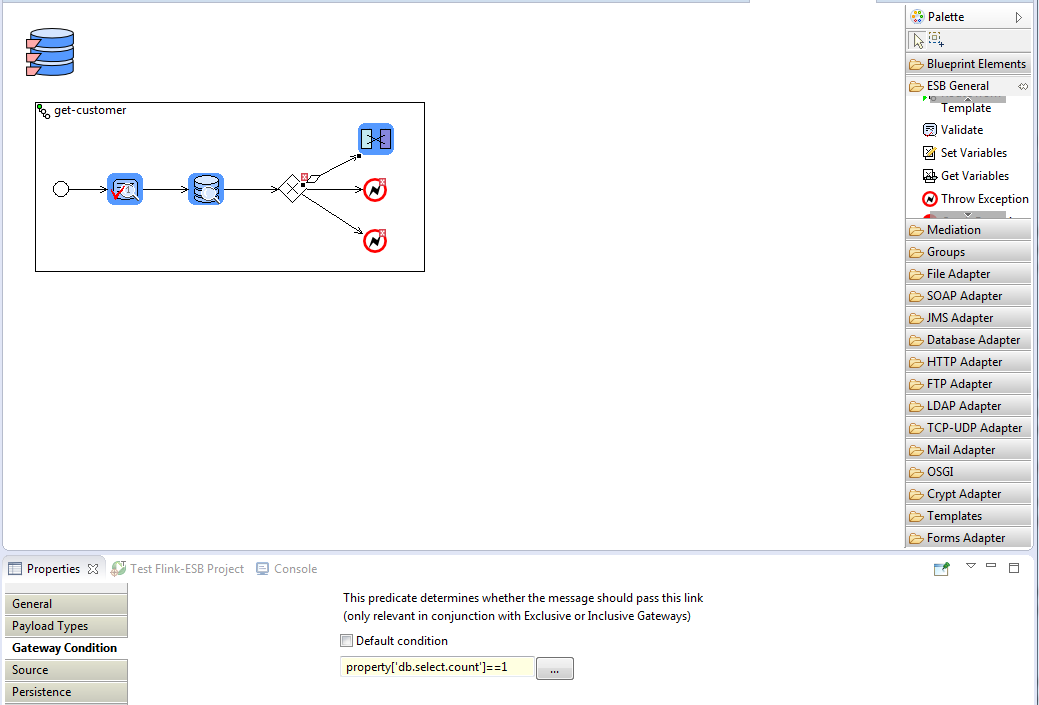
 Click "Save Changes". Notice, how the shape of connection link changes.
 Click on connection link between "Exclusive Gateway" and the first "Throw Exception". Click "Gateway Condition" tab in properties window, unselect "Default condition" checkbox and enter property['db.select.count']>1 in the condition textbox, press "Save Changes".
 Select the first "Throw Exception" component. Enter 'Customer id not unique for id='+property['id'] in "Message" textbox in properties window. Click "Save changes".
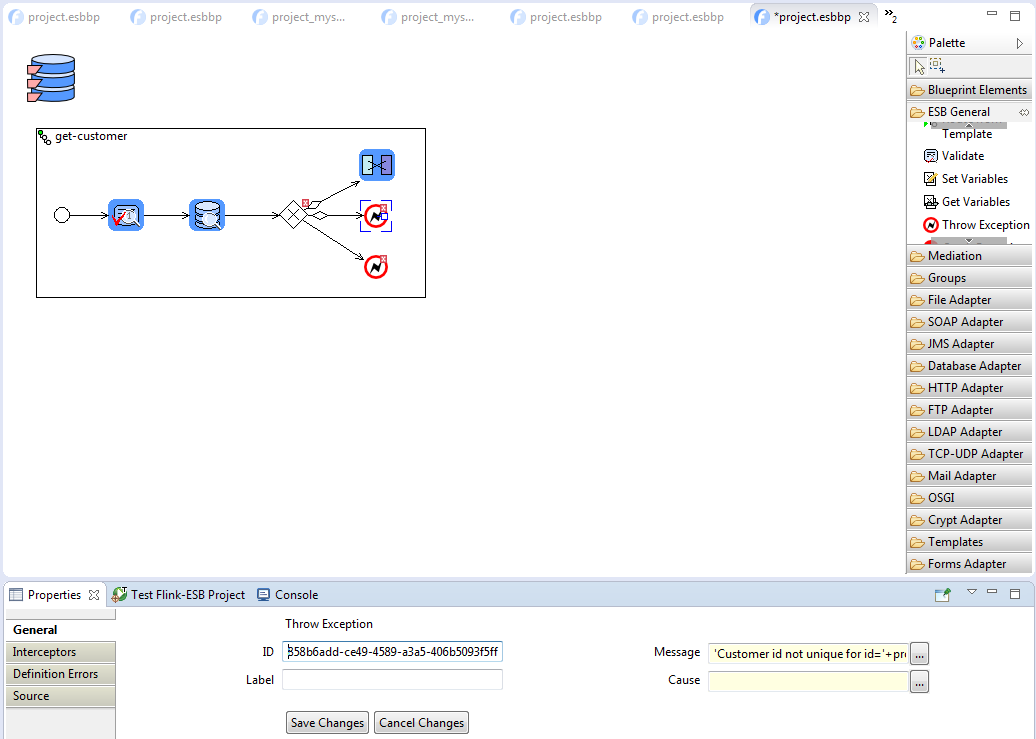
 Select the second "Throw Exception" component. Enter 'Customer not found for id='+property['id'] in "Message" textbox in properties window. Click "Save changes" and then save the file. Restart application.
 Go to Flink-ESB Admin Console and call "get-customer" route. Do not forget to enter [ 'id' : 1 ] in "Properties" textbox. You should get the same response in XML format as before.
 Now try searching for id=2 (or any other number). This time you should get following error message:
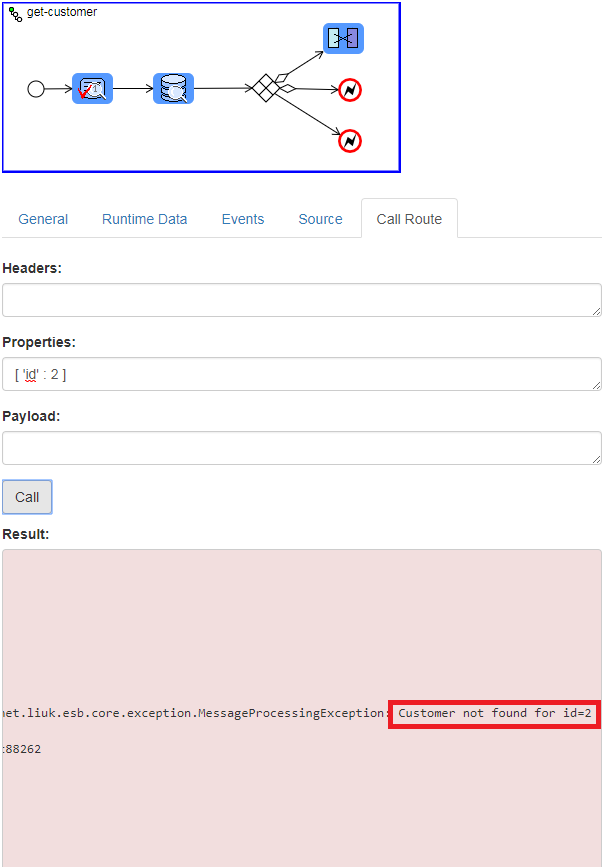
Step 7: creating HTTP server and adding a new route, handling HTTP GET request
 Go to Flink-ESB Editor, expand "HTTP Adapter" palette, and add "HTTP Server" component onto editor canvas. Set "ID" as http-server.
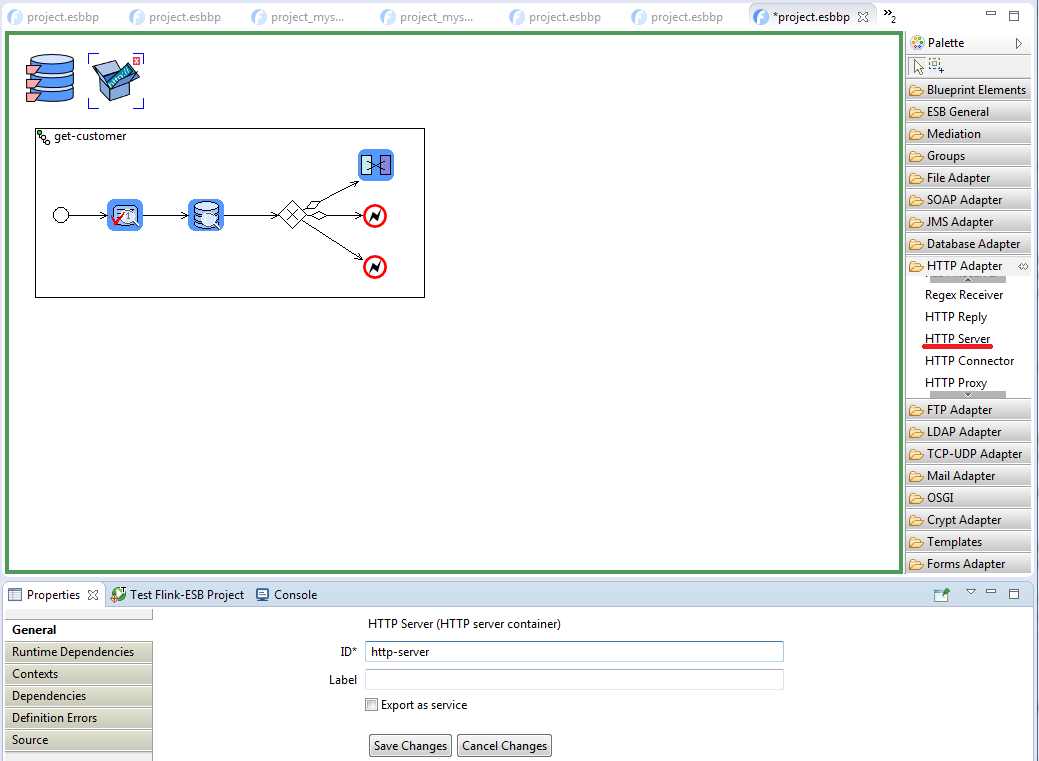
 Press "Save changes". Drag and drop "HTTP Connector" component in "HTTP Adapter" palette into editor canvas. Enter properties as on picture below: "ID" : http-connector, "HTTP-Server-Ref" : http-server, "Hostname" : 0.0.0.0, "Port" : 4545:
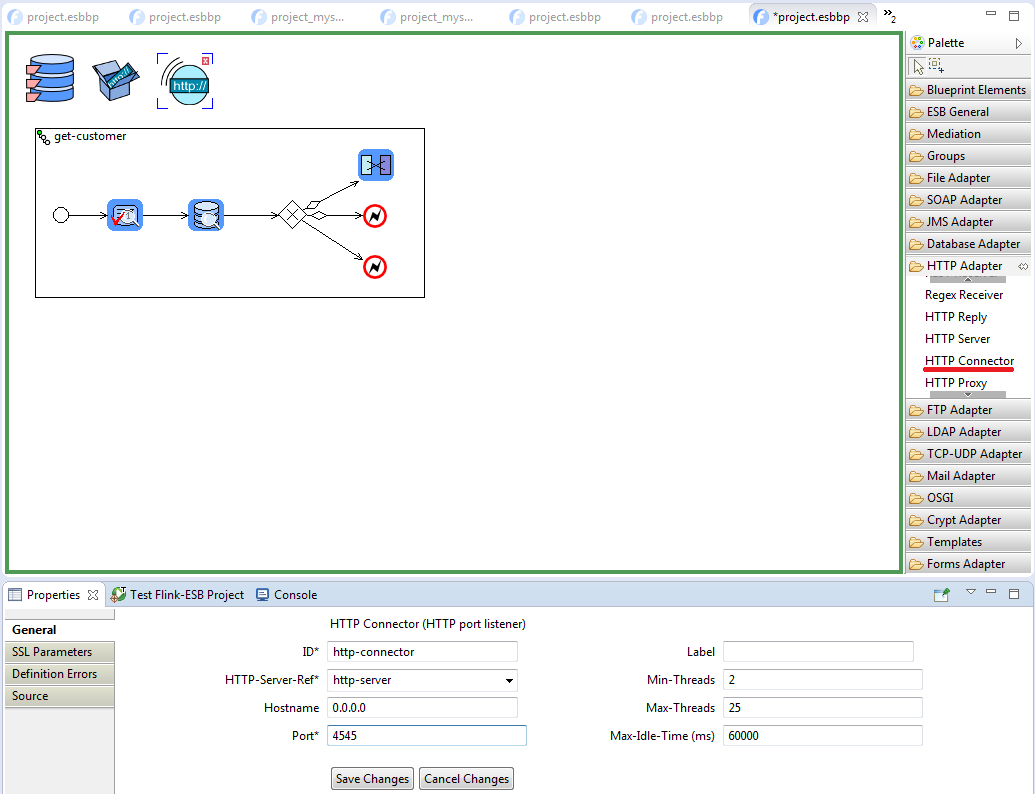
 Press "Save changes".
 Now create another route and call it "http-get-customer".
 Place "REST Receiver" from "HTTP Adapter" palette, and then "Call Subflow" from "ESB General" palette within a new route. Connect them as on picture below:

 Select "REST Receiver" and enter its properties as on picture below: "HTTP-Server-Ref" : http-server, "Url" : /customer, "HTTP-Method" : GET:

 Press "Save changes". Now select "Call Subflow" component and enter its properties as below: "Flow-Ref" : get-customer:

 Press "Save changes" and save the file
 Restart the application in Flink-ESB Editor.
Step 8: verifying HTTP GET functionality using browser
 Type following URL in the browser: http://127.0.0.1:4545/customer. You should get following response:
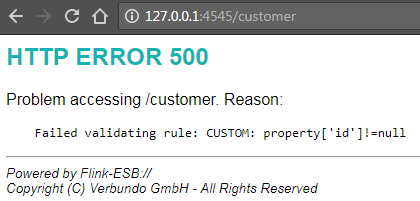
 Now try this: http://127.0.0.1:4545/customer?id=1. This time you should get:
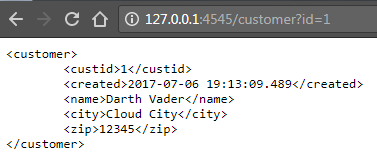
Notice, how adding a query parameter automatically creates a message property with the same name.
 Now try some non existing ID: http://127.0.0.1:4545/customer?id=2. The response should be, as we declared in error handling message:
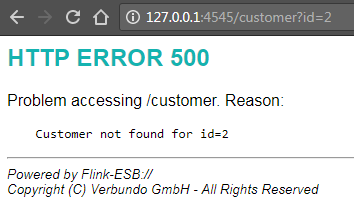
 There is one more thing left, before we can consider HTTP GET finished. Even though a route outputs XML message in case data in DB found, but the server does not set the proper "Content-Type" HTTP header. So client application would not know the type of response and character encoding.
 To fix this, go to Editor and select "REST Receiver" component, click "HTTP Headers" tab in properties window, press "Add Header" and type data as on picture below: "Header-Name" : Content-Type, "Header-Value" : 'text/xml; charset=UTF-8':

 Press "Save changes", save the file and restart the application in the Editor.
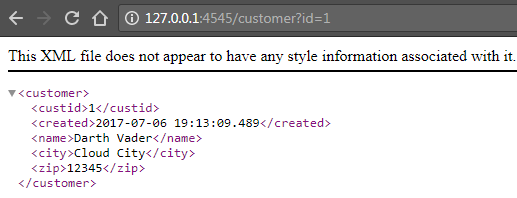
 Now try http://127.0.0.1:4545/customer?id=1 again. This time you should get a proper answer:
See also:
Part 2: add a service to insert data into DB using HTTP POST request
Part 3: add a service to update data in DB using HTTP PUT request
Part 4: add a service to delete data in DB using HTTP DELETE request
Part 5: add project variables to make environment specific data configurable
