Flink-ESB Tutorials
Use case: create "customer-api" application to store/retrieve data in DB over HTTP (part 5)
Short description: Create Flink-ESB application offering 4 HTTP services to read / insert / update / delete customer data in the database.
Customer data is stored in the database in one table, called CUSTOMER.

Part 5: add project variables to make environment specific data configurable
In the fifth part of the tutorial we will prepare "customer-api" application for the deployment in runtime environment:
make sure the application does not contain any hard coded environment specific parameters, like database name, HTTP port, user / password etc.
add a Property-Placeholder component to the application to hold a list of project variables and their default values >>
replace environment specific values within "Database Connection" component with project variables >>
replace environment specific values within "HTTP Connector" component with project variables >>
create a new folder within "customer-api" project and move "customer.xsd" schema file in that folder >>
test "customer-api" services after project modification >>
Following Flink-ESB components are introduced in this part of tutorial:
First level components:

See also:
Part 1: create new application and develop HTTP GET service reading data from database
Part 2: add a service to insert data into DB using HTTP POST request
Part 3: add a service to update data in DB using HTTP PUT request
Part 4: add a service to delete data in DB using HTTP DELETE request
Step 1: adding "Property-Placeholder" to the application
 Go to Flink-ESB Editor. After finishing part 4 of the tutorial you should have an application looking similar to the one on picture below:
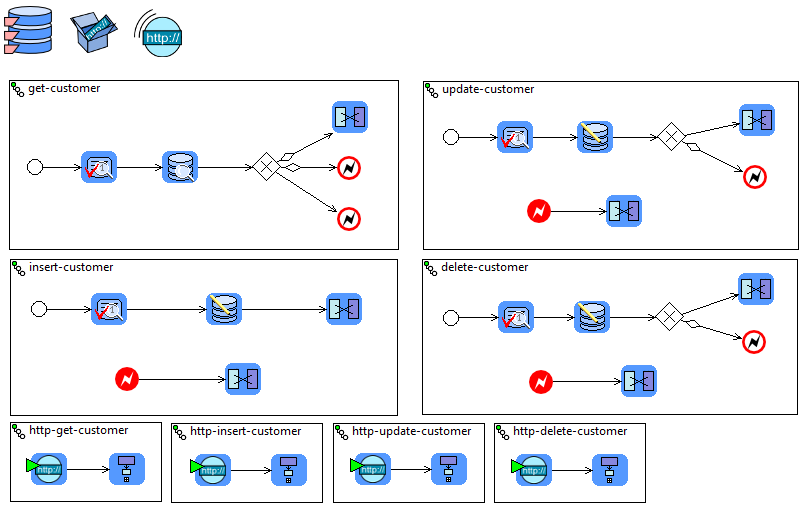
 You should have a DB connection pool, HTTP server, HTTP connector and eight routes with names "get-customer", "insert-customer", "update-customer", "delete-customer", "http-get-customer", "http-insert-customer", "http-update-customer" and "http-delete-customer".
 Click on "Blueprint Elements" palette drawer to expand it, and place a "Property-Placeholder" on editor canvas.
 Enter following data on properties window: "Persistent-Id" : customer.api:
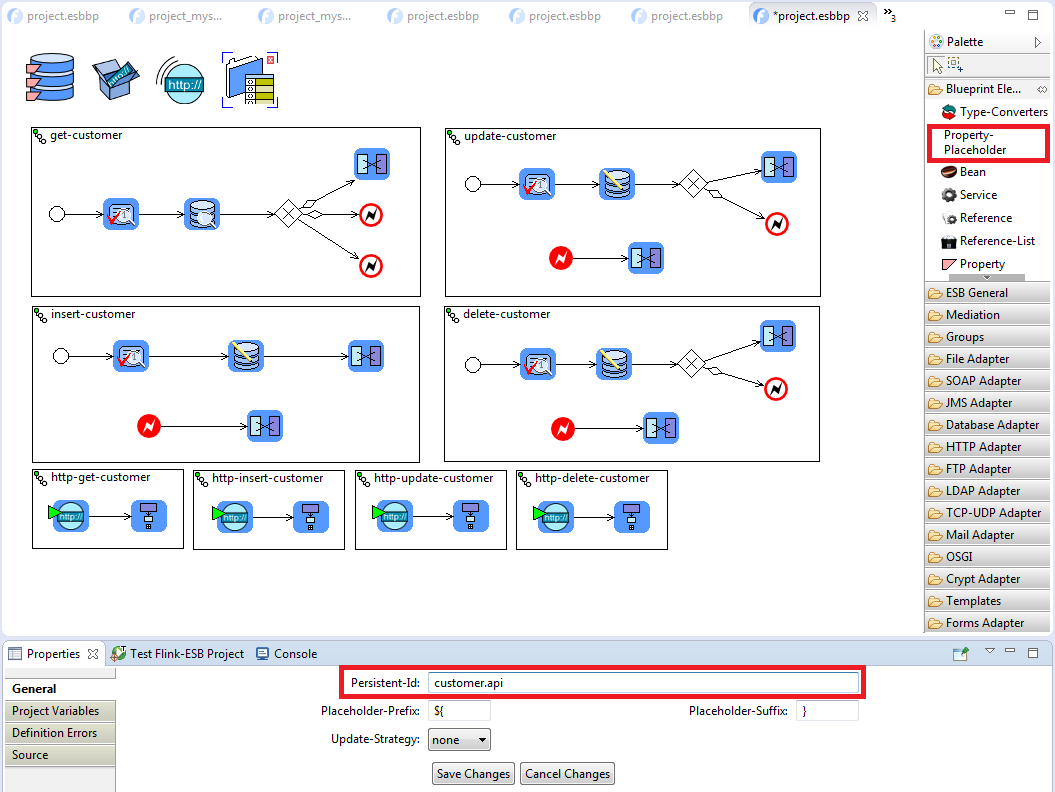
 Press "Save Changes".
Step 2: replacing environment specific values within "Database Connection" component with project variables
 Select "Database Connection" component in Flink-ESB Editor and check its properties. What properties should be made configurable? Database hostname, port, name, username and password are environment specific, and therefore must always be configurable.
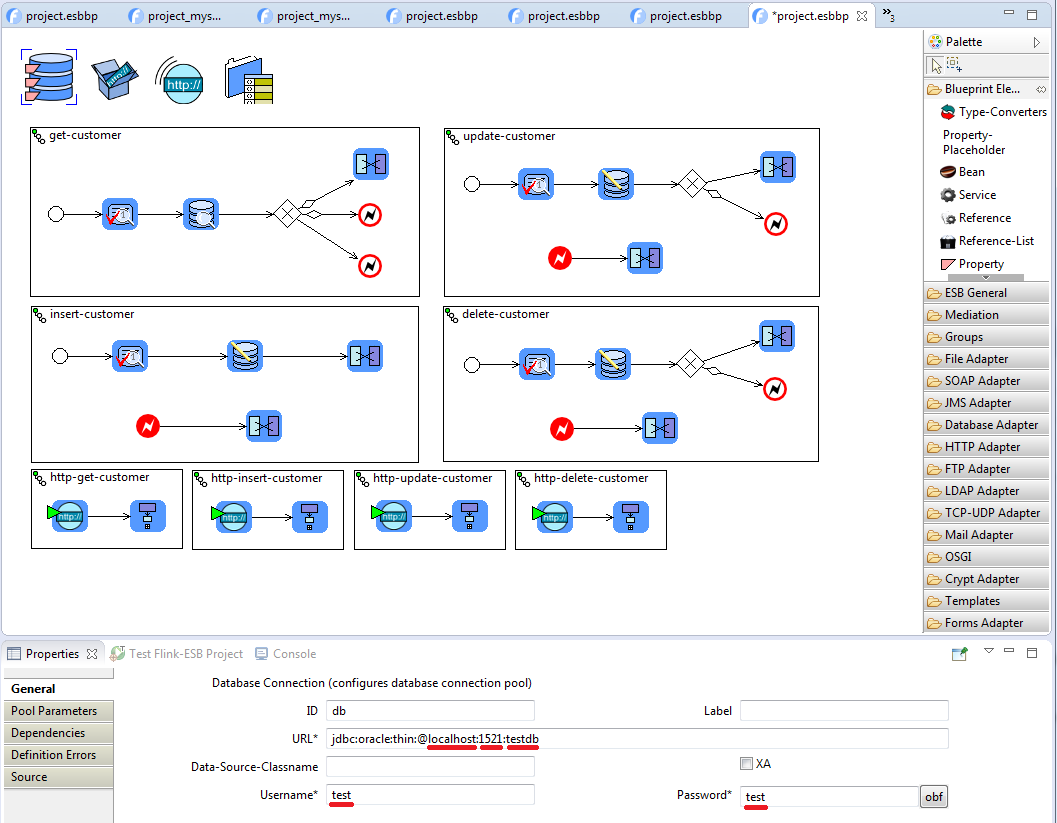
 Select "Property-Placeholder" component and click "Project Variables" tab in the properties window.
 Right click on empty row and select "Add new entry" from the context menu. A new row appears in the table containing default values for property name and property value:

 Click on property name and type: db.host, click on property value and type: localhost. This creates a project variable with name "db.host" and default value "localhost".

 Right click in the table again to add the second variable. Enter db.port as varable name, and 1521 as variable default value.
 Add another variable. Enter db.name as variable name, and testdb as variable default value (adjust it to your DB name).
 Add another variable. Enter db.user as variable name, and test as variable default value (adjust it to your DB username).
 Add another variable. Enter db.password as variable name, and test as variable default value (adjust it to your DB password).

Defining DB password in clear text is a bad practice. To avoid this, click "Database Connection" component in the Editor and click "obf" button besides "Password" property field. Now copy obfuscated value, select "Property-Placeholder" and replace a value of "db.password" property with obfuscated value.
 Select "Database Connection" component in Flink-ESB Editor and modify its properties as on picture below:

Make sure property names enclosed in curly braces match exactly with the property names you've defined in "Property-Placeholder" component !!!
Step 3: replacing environment specific values within "HTTP Connector" component with project variables
 Select "HTTP Connector" component in Flink-ESB Editor and check its properties. What properties should be made configurable? Hostname and port are environment specific, and therefore must always be configurable. We could also make other parameters ("Min-Threads", "Max-Threads", "Max-Idle-Time" and SSL parameters in "SSL Parameters" tab) configurable. But to make this tutorial short, we will leave them hard coded.

 Select "Property-Placeholder" component and add another variable. Enter http.host as variable name, and 0.0.0.0 as variable default value.
 Add another variable. Enter http.port as variable name, and 4545 as variable default value (adjust it if needed).
 Now the project variables should look like on picture below:

 Select "HTTP Connector" component in Flink-ESB Editor and modify its properties as on picture below:

 Click "Save Changes".
Make sure property names enclosed in curly braces match exactly with the property names you've defined in "Property-Placeholder" component !!!
Step 4: adding "customer.xsd" schema file to the application archive
 "Validator" components within "insert-customer" and "update-customer" routes parse incoming messages against schema file:
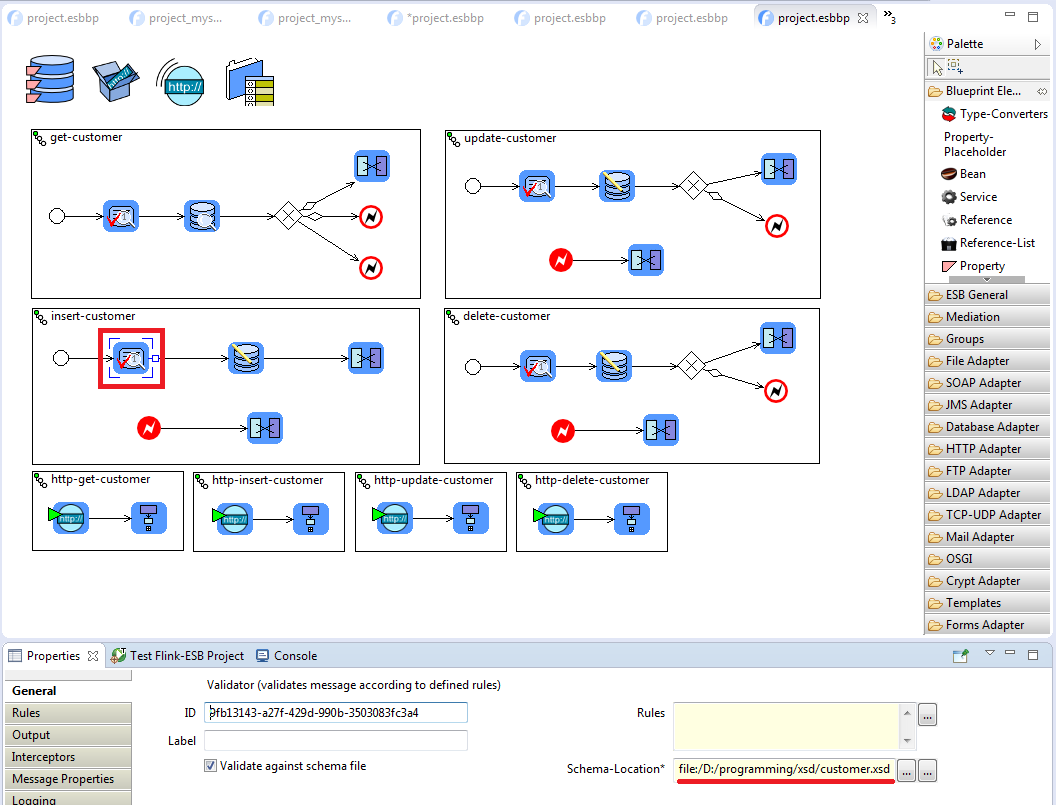
 This schema file is referenced by its absolute path on the local machine. We could replace this path with project variable to make it configurable. But still it has a drawback: we will have to make sure this file exists on every machine, where this application will be installed.
 Much better solution would be to include this schema file in application archive, so that we don't need to copy it explicitly on every machine.
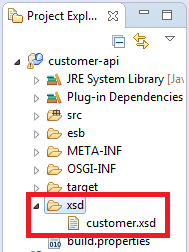
 Right click on "customer-api" project in "Project Explorer" view and select "New -> Folder". Type xsd as folder name to create a new folder within application. Press "Finish" button to create a new folder.
 Open "Windows Explorer" on your Windows PC, go to the folder where "customer.xsd" file is stored, select it and copy it to the buffer. Go to Flink-ESB Editor, select "xsd" folder within "customer-api" application and press Ctrl-V to paste the content of file there.
 Select "Validator" component within "insert-customer" route and modify its "Schema-Location" property to jar:/xsd/customer.xsd:

 Press "Save Changes". Now select "Validator" component within "update-customer" route and modify its "Schema-Location" property to jar:/xsd/customer.xsd.
 Now we have to make sure "xsd" folder is copied to the application archive when the application is build. Double click on "build.properties" file within "customer-api" application in "Project Explorer" view. Find a checkbox beside "xsd" folder in the "Binary Build" panel and select this checkbox:
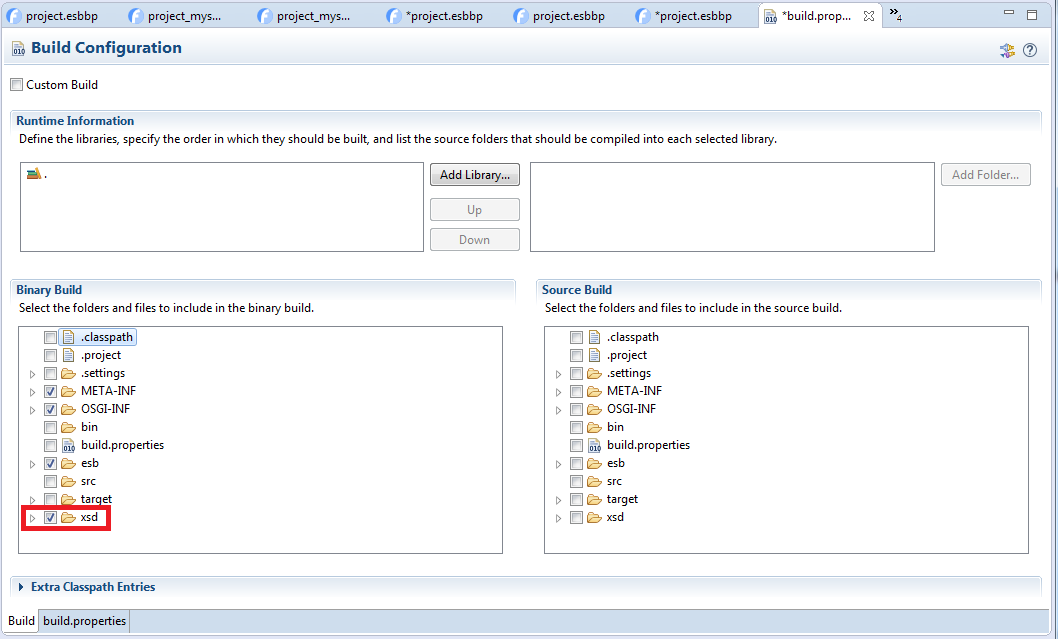
 Save "build.properties" file and then save Flink-ESB project file.
Step 5: testing application
 Restart "customer-api" application in Flink-ESB Editor.
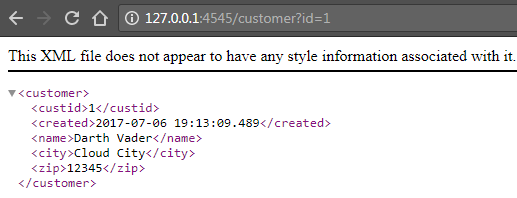
 Go to the browser and type http://localhost:4545/customer?id=1 as URL. You should get following response:
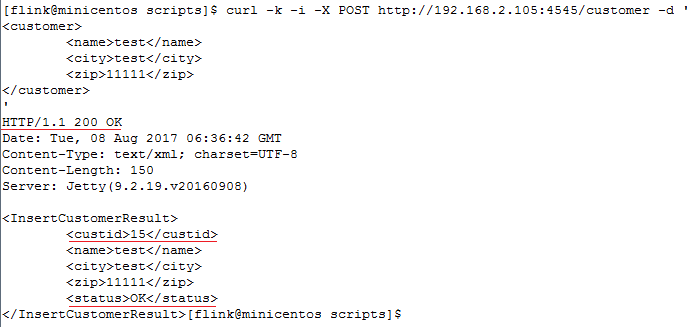
 Now try inserting new data. For this you can use either some browser plugin, or some GUI tool like SoapUI, or some command tool like curl. For curl run this command:
curl -k -i -X POST http://localhost:4545/customer -d '
<customer>
	<name>test</name>
	<city>test</city>
	<zip>11111</zip>
</customer>'
 You should get a response as on picture below:
 You can also try running update and delete services as on part 3 and part 4 of this tutorial. All services should be working fine.
 Now when the application is going to be installed on Flink-ESB runtime environment, you just have to make sure to adjust project variables in file "customer.api.cfg" in "appconf" folder of Flink-ESB runtime instance.
Why "customer.api.cfg"? Remember setting properties of "Property-Placeholder" component? A property with name "Persistent-Id" defines the prefix of configuration file name. We've set it to "customer.api". File extension should always be ".cfg". So we get a full name for the properties file: "customer.api.cfg".
 The format of "customer.api.cfg" properties file on the runtime instance could be like the one below:
db.host=localhost
db.port=1521
db.name=testdb
db.user=test
db.password=#!8L4uMEZaOuE=
http.host=0.0.0.0
http.port=4545
 You don't need to define all properties there, as for "Property-Placeholder" component in Flink-ESB Editor. You could add just the parameters, whose values you want to adjust:
db.host=192.168.2.105
http.port=8080
 In this case all parameters will be used with their default values (as defined in Flink-ESB Editor), just for "db.host" and "http.port" custom values will be used.
See also:
Part 1: create new application and develop HTTP GET service reading data from database
Part 2: add a service to insert data into DB using HTTP POST request
Part 3: add a service to update data in DB using HTTP PUT request
Part 4: add a service to delete data in DB using HTTP DELETE request
