Flink-ESB Tutorials
Use case: create "customer-api" application to store/retrieve data in DB over HTTP (part 2)
Short description: Create Flink-ESB application offering 4 HTTP services to read / insert / update / delete customer data in the database.
Customer data is stored in the database in one table, called CUSTOMER.

Part 2: add a service to insert data into DB using HTTP POST request
In the second part of the tutorial we will:
create a route called "insert-customer" to insert data into the database >>
set up a Validate component within a route to parse incoming XML against schema file >>
set up a Data writer component within a route to run INSERT SQL statement, injecting values of bind variables from incoming XML message using "xpath" expression >>
test a route in Flink-ESB Admin Console >>
set up a Transformer component within a route to output data in XML format >>
set up a Catch Exception and a Transformer components within a route to create an error handler outputting data in custom format >>
create a route, handling HTTP POST request and calling another route, which inserts data into the database >>
set up a REST Receiver starting component within a route to start route on every incoming HTTP POST request >>
set up a Call Subflow component within a route to call "insert-customer" subflow >>
test HTTP POST service and add a proper "Content-Type" HTTP header >>
Following Flink-ESB components are used in this part of tutorial:
First level components:
 Route : represents a sequence of activities, performed upon the message. Route contains route node components connected with links. Route node activities and links define the functionality of the route. Route can either have a starting event (received HTTP request, timer etc.), or it can be called from other routes (in this case such route is called subflow).
Route nodes:
 Subflow : starting route node, used to mark beginning of the subflow. Subflow is kind of route, which does not have its own trigger (HTTP request, timer etc.). Every route, that does not have a specific starting event, must start with this component.
 Validate : route node, used to validate a message. Can parse XML against schema file, and/or validate against one or multiple custom rules.
 Transformer : used to transform a message in different format.
 Data writer : used to run INSERT, UPDATE or DELETE SQL statements in the database. Must refer to "DB Connection Pool".
 Catch Exception : used within a route to create a separate processing flow, which is triggered in case exception is thrown.
 REST Receiver : starting route node, used always at the begin of the route as starting event. Must refer to "HTTP Server". Triggers after receiving HTTP request with configured HTTP method + URI
 Call Subflow : used to call a subflow (another route, which has a "Subflow" component as a starting event).
See also:
Part 1: create new application and develop HTTP GET service reading data from database
Part 3: add a service to update data in DB using HTTP PUT request
Part 4: add a service to delete data in DB using HTTP DELETE request
Part 5: add project variables to make environment specific data configurable
Step 1: creating a route to insert data to the database
 Go to Flink-ESB Editor. After finishing part 1 of the tutorial you should have an application looking similar to the one on picture below:
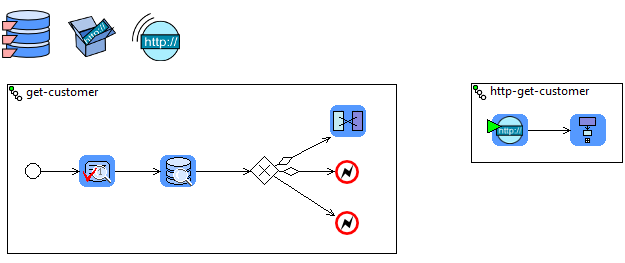
 You should have a DB connection pool, HTTP server, HTTP connector and two routes with names "get-customer" and "http-get-customer".
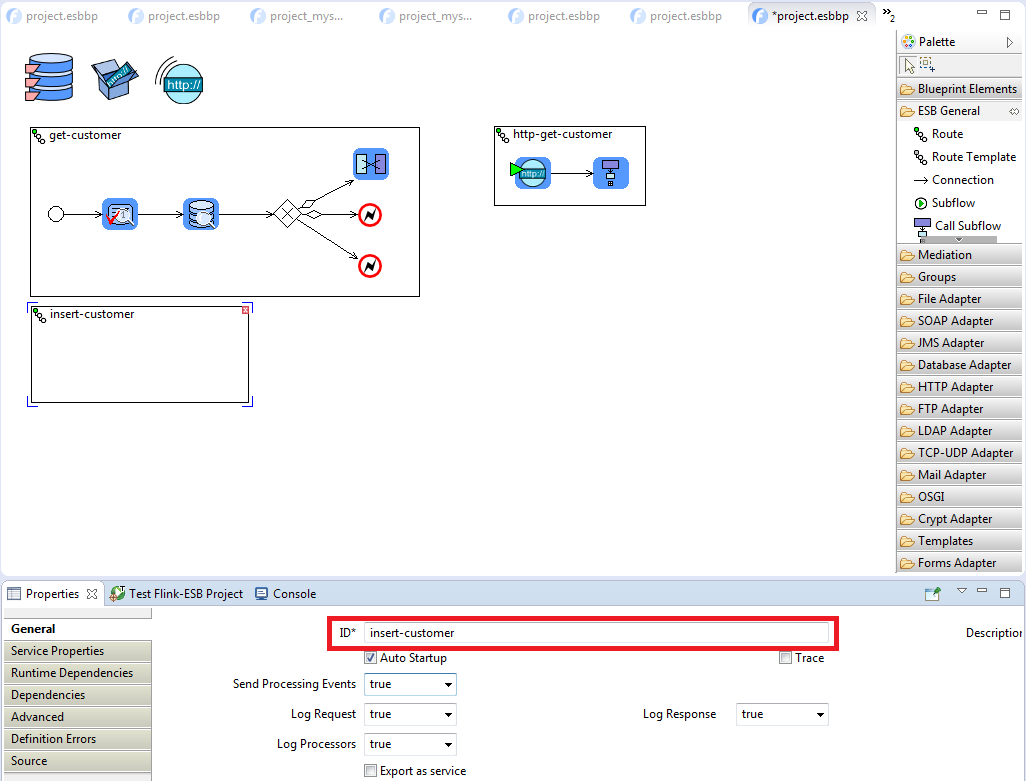
 Click on "ESB General" palette drawer to expand it, and place a new "Route" on editor canvas.
 Give a route name "insert-customer":
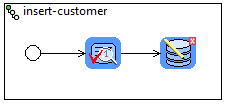
 Place following components from left to right onto the route: "Subflow" and "Validate" from "ESB General" palette, "Data writer" from "Database Adapter" palette. Connect them as on picture below:
 With this route we are going to send XML document, containing customer data, that must be inserted into the database. So, it is important to validate an incoming message, and check whether it has correct format. Since it is XML message, we will validate it by parsing it against XML schema file.
 Create a new file in text editor and paste following content into it:
<?xml version="1.0" encoding="UTF-8"?>
<xsd:schema xmlns:xsd="http://www.w3.org/2001/XMLSchema">
	<xsd:element name="customer" type="customerType"/>
	<xsd:complexType name="customerType">
		<xsd:all>
			<xsd:element name="name" type="xsd:string"/>
			<xsd:element name="city" type="xsd:string"/>
			<xsd:element name="zip" type="xsd:string"/>
		</xsd:all>
	</xsd:complexType>
</xsd:schema>
 Save this file and give it a name "customer.xsd".
 Now select "Validate" component in the Editor and provide its properties as on picture below:

 Click "Save Changes". Select "Data writer" and enter its properties as below: "DB-Connection-Ref" : db, "SQL" : 'insert into customer (custid,name,city,zip) values (custidseq.nextval,?,?,?)':

 Click "Save Changes", then click "Bind Variables" tab, press "Add Parameter" button and enter data: "Param-Type" : VARCHAR, "Param-Value" : xpath(payload,'//name').
 Press "Add Parameter" button again, and add the second bind variable: "Param-Type" : VARCHAR, "Param-Value" : xpath(payload,'//city').
 Press "Add Parameter" button again, and add the third bind variable: "Param-Type" : VARCHAR, "Param-Value" : xpath(payload,'//zip'). Bind variables should look like on picture below:

 Click "Save Changes", then click on "Return Columns" tab and enter data as below: "Property-Name" : returned, "Columns" : CUSTID,NAME,CITY,ZIP:

 Click "Save Changes", save the file and restart the application.
Step 2: testing "insert-customer" route in Flink-ESB Admin Console
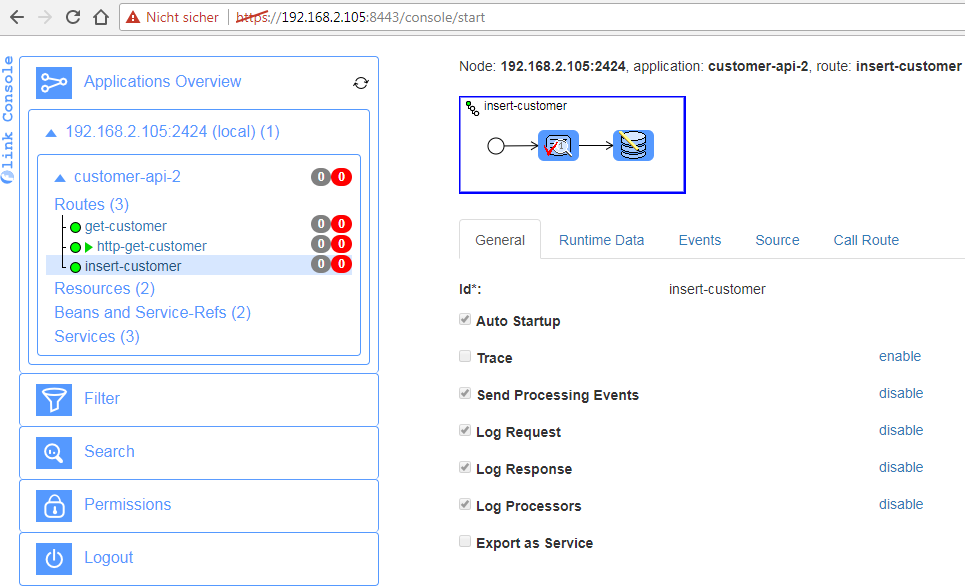
 When the project is started, go to url https://localhost:8443/console/start in the browser. Login to Flink-ESB Admin Console with default username/password: admin/admin. Click on "Application Overview" to expand it, then click on triangle on the left side of instance name. Now you should see an application with name "customer-api". Click on the small triangle to expand components of the project. Click on "Routes" to expand it. Now you should see a route with name "insert-customer". Click on it to see its details on the right side of Admin Console:
 Click "Call Route" tab. Paste following message into "Payload" textbox:
'<customer>
	<name>Luke Skywalker</name>
	<city>Cloud City</city>
	<zip>54321</zip>
</customer>'
 Press "Call" button. You should get response, as on picture below:
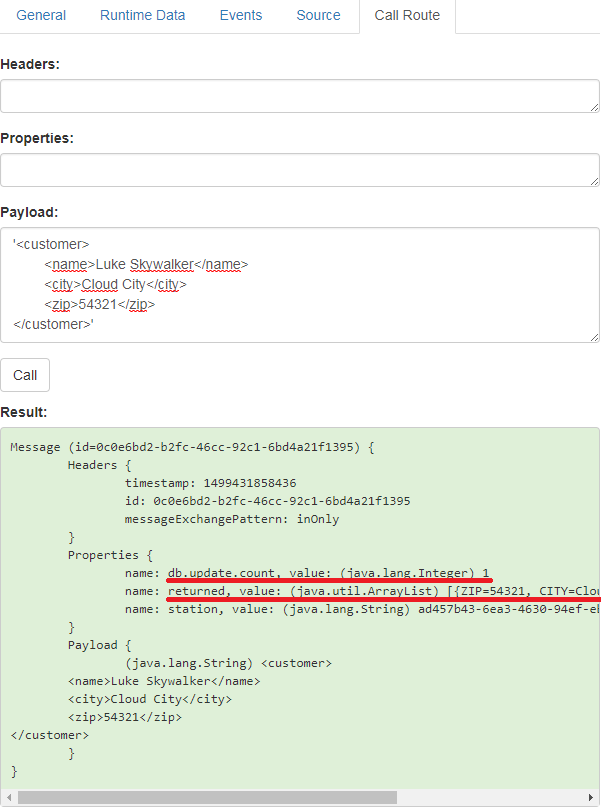
 Check message properties of the response. Some of them contain important information. "db.update.count" shows the number of records updated during the last DB write. This property is set after INSERT, UPDATE and DELETE.
 Another interesting property you should have in the response is "returned", containing array list with one entry. This entry is a map. Keys of the map are the names of columns, values are the values of respective columns. It also contains a key "CUSTID" with value 2. This shows you an ID of the newly generated entry in the database. So you don't need to call SELECT query to get that ID, you have that already as the result of INSERT.
Step 3: modifying "insert-customer" to output result in XML format
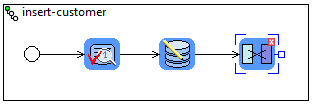
 Got to Editor. Add "Transformer" from "Mediation" palette to the route right after "Data writer". Connect "Data writer" with "Transformer". Resize the route to make all components visible. Now the route should look like the picture below:
 Click on "Transformer" component and enter its properties like following: "Type" : custom, "Custom-Expression" :
'<InsertCustomerResult>
	<custid>'+property['returned'][0]['CUSTID']+'</custid>
	<name>'+property['returned'][0]['NAME']+'</name>
	<city>'+property['returned'][0]['CITY']+'</city>
	<zip>'+property['returned'][0]['ZIP']+'</zip>
	<status>OK</status>
</InsertCustomerResult>'

 Press "Save Changes", save file and restart the application.
 Go to Flink-ESB Admin Console, select "insert-customer" route, click "Call Route" tab, and paste following into "Payload" textbox:
'<customer>
	<name>Obi-Wan Kenobi</name>
	<city>Stewjon</city>
	<zip>99999</zip>
</customer>'
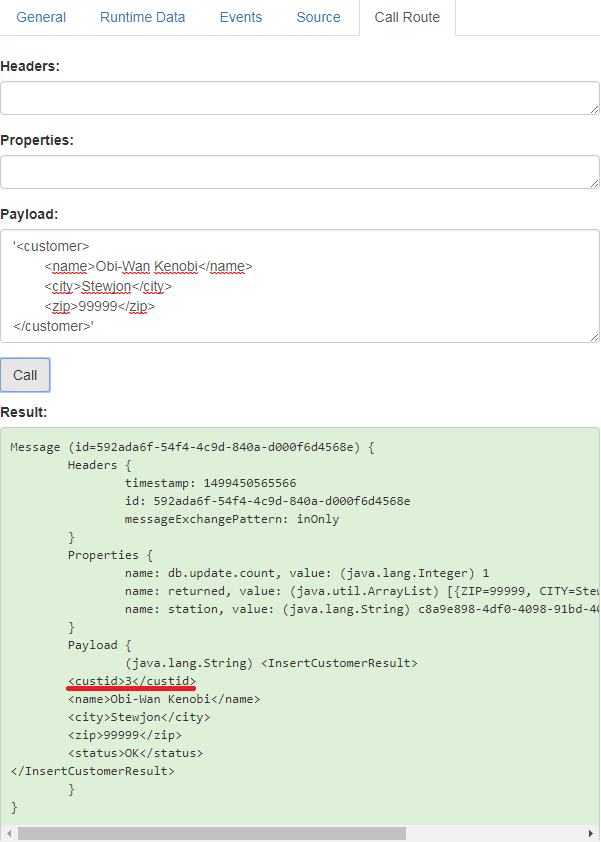
 Press "Call". You should get now XML response, containing CUSTID of the record, you've just inserted into the database:
Step 4: adding an error handler to "insert-customer" route
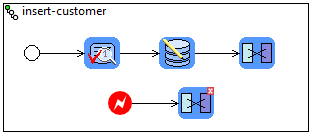
 Go to Flink-ESB Editor and add "Catch Exception" component from "ESB General palette, and "Transformer" from "Mediation" palette to "insert-customer" route. Place them both below all other components. Create a connection link from "Catch Exception" to "Mediation" as on picture below:
 Select a "Transformer", that you've just added and enter its properties as below: "Type" : custom, "Custom-Expression" :
'<InsertCustomerResult>
	<name>'+xpath(payload,'//name')+'</name>
	<city>'+xpath(payload,'//city')+'</city>
	<zip>'+xpath(payload,'//zip')+'</zip>
	<status>ERROR</status>
	<error>'+escapeXml(error.getMessage())+'</error>
</InsertCustomerResult>'

 Press "Save Changes", save file and restart the application.
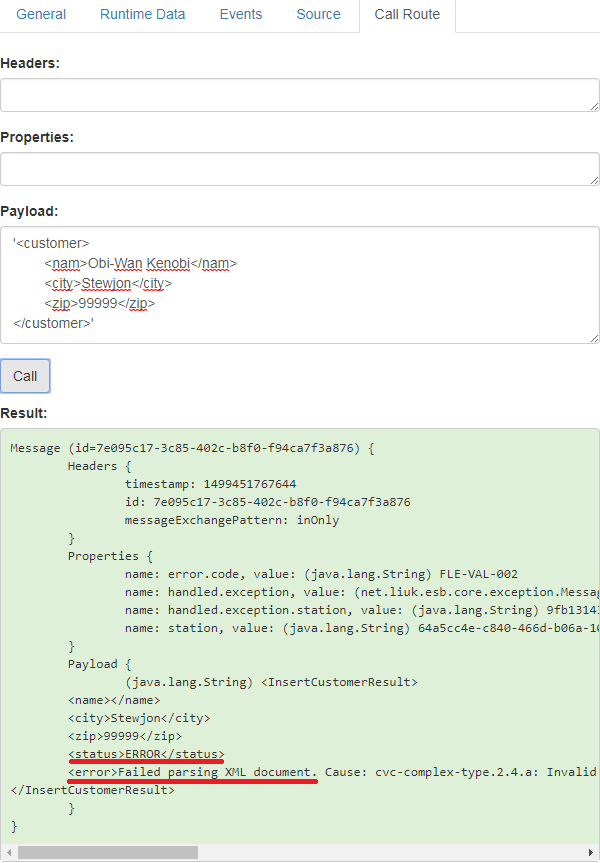
 Go to Flink-ESB Admin Console, select "insert-customer" route, click "Call Route" tab, and paste following into "Payload" textbox:
'<customer>
	<nam>Obi-Wan Kenobi</nam>
	<city>Stewjon</city>
	<zip>99999</zip>
</customer>'
 Press "Call". Now you should get a response XML with <status>ERROR</status>, containing <error> element with the error message:
Step 5: creating a new route, handling HTTP POST request
 Go to Flink-ESB Editor and create another route. Call it "http-insert-customer".
 Place "REST Receiver" from "HTTP Adapter" palette, and then "Call Subflow" from "ESB General" palette within a new route. Connect them as on picture below:

 Select "REST Receiver" and enter its properties as on picture below: "HTTP-Server-Ref" : http-server, "Url" : /customer, "HTTP-Method" : POST:

 Press "Save changes". Now select "Call Subflow" component and enter its properties as below: "Flow-Ref" : insert-customer:

 Press "Save changes" and save the file
 Restart the application in Flink-ESB Editor.
Step 6: testing HTTP POST service and adding "Content-Type" HTTP header
 To test HTTP POST request we could use either some browser plugin, or SoapUI, or any other tool, which is able to call HTTP POST. I will use "curl" command.
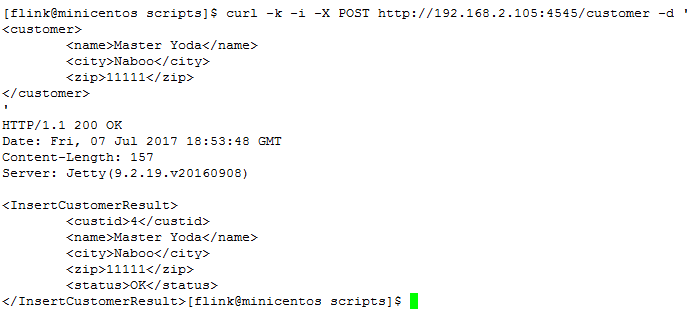
 To call HTTP POST service with "curl" use this command:
curl -k -i -X POST http://localhost:4545/customer -d '
<customer>
        <name>Master Yoda</name>
        <city>Naboo</city>
        <zip>11111</zip>
</customer>
'
 Calling this command you should get a valid XML response with status OK:
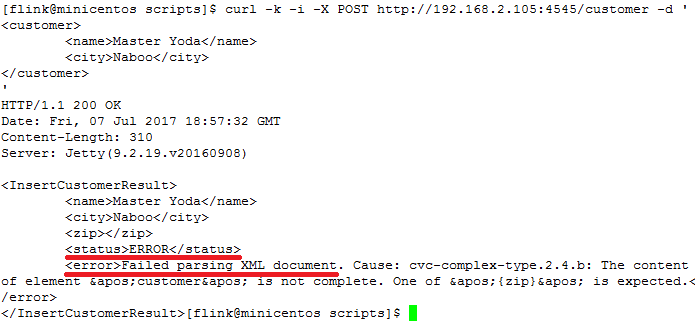
 Now try the same command with invalid XML message, for example this one:
curl -k -i -X POST http://localhost:4545/customer -d '
<customer>
        <name>Master Yoda</name>
        <city>Naboo</city>
</customer>
'
 Check the content of response XML:
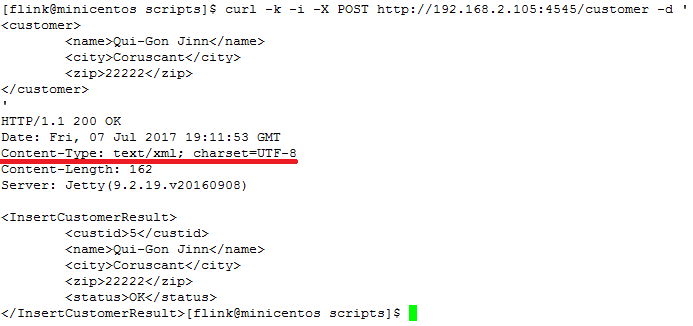
 Now the only thing missing in the response is "Content-Type" HTTP header, telling client application what kind of message it is getting from the server, and what is the character encoding. So let's fix this.
 Go to Flink-ESB Editor and select "REST Receiver" within "http-insert-customer" route. Click "HTTP Headers" tab in properties window, and press "Add Header" button. Enter data as on the picture below: "Header-Name" : Content-Type, "Header-Value" : 'text/xml; charset=UTF-8':

 Press "Save changes", save the file and restart the application.
 Now call curl command again:
curl -k -i -X POST http://localhost:4545/customer -d '
<customer>
        <name>Qui-Gon Jinn</name>
        <city>Coruscant</city>
        <zip>22222</zip>
</customer>
'
 This time you should get a proper XML response, containing "Content-Type" HTTP Header:
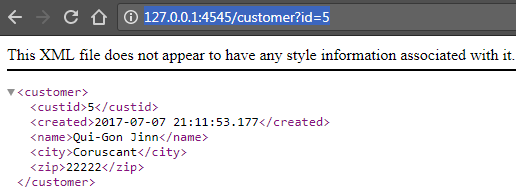
 Go ahead and try with the browser http://127.0.0.1:4545/customer?id=5. You should get a response like on picture below:
 So now we have 2 working services to read customer data with HTTP GET, created in part 1 of the tutorial, and to insert new customer data with HTTP POST.
See also:
Part 1: create new application and develop HTTP GET service reading data from database
Part 3: add a service to update data in DB using HTTP PUT request
Part 4: add a service to delete data in DB using HTTP DELETE request
Part 5: add project variables to make environment specific data configurable
